Thursday, November 7, 2013

How to play all MKV movies on Kindle Fire HDX without any limit

Summary: Wanna know the best method to play MKV movies with DTS sound on Kindle Fire HDX? Here I recommend you to convert MKV DTS to MP4 video in AAC audio and still keep its good quality.


Amazon has just officially refreshed its product line and introduced the new Kindle Fire HDX tablets- Kindle Fire HDX 8.9 and Kindle Fire HDX 7. Kindle Fire HDX tablets have a high resolution display and high pixel density for an incredible multimedia experience. The display features over 2 million pixels for vivid, lifelike images that go beyond standard HD.

When you got the new Amazon Kindle Fire HDX tablet, what you will do next? Personally, I will add my personal video/movie collection to my Fire HDX to cancel my leisure time. No matter which model of Kindle Fire HDX(7.0/8.9) you have, I’ve got some suggestions and short guides to help you get MKV files playable on Kindle Fire HDX smoothly.

As Kindle Fire HD, the new generation Fire HDX is not compatible with MKV movie source. Some guys would like to install a third-party video player, but some DTS encoded MKV files are not supported well yet with a 3rd party video player app. An alternative solution is to convert MKV to Kindle Fire HDX friendly H.264 MP4, which can be considered as the best video format for Amazon Kindle tablets.

Brorsoft Video Converter is the tool I’m using and recommend. Fast and smooth performance. It helps me batch convert 5+ MKV videos to a Kindle Fire HDX readable MP4 video. It’s freely to adjust the video, audio parameters to get a decent output video that I want. Plus, it can also help you to encode AVI, WMV, MOV, VOB, MTS, MPG videos to Kindle Fire HDX for easy playback. If you are Mac users, Brorsoft Video Converter for Mac is right for you. Detailed steps as below.

Convert all MKV files (DTS encoded included) to Kindle Fire HDX MP4 video

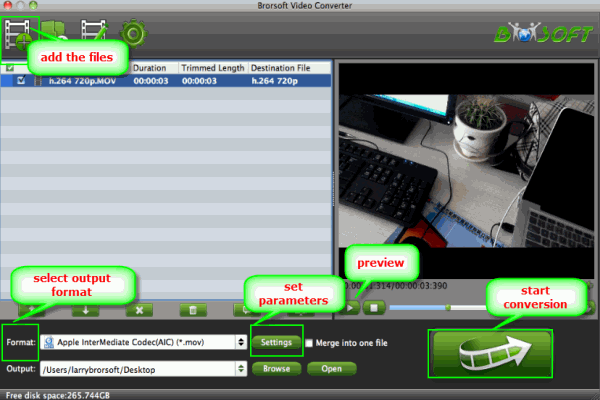
STEP 1. Download and install the MKV to Kindle Fire HDX Converter and launch it to add the MKV files. It supports batch conversion.


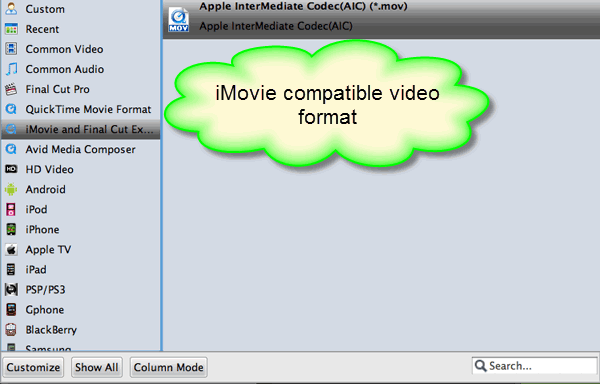
STEP 2. Click the “Format” drop down list and choose Android >> Amazon Kindle Fire HD H.264(*.mp4) as target format for your Fire HDX 8.9/7.0 tablet.


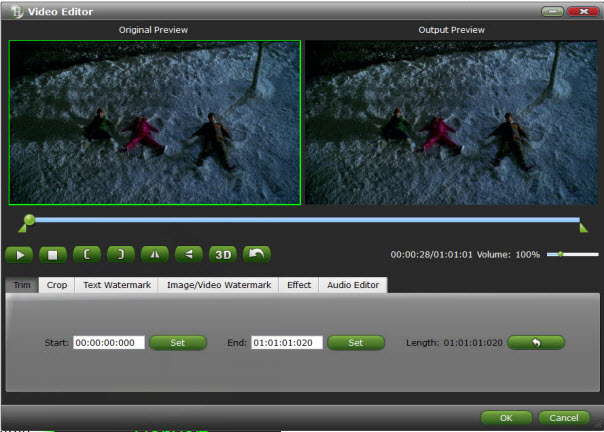
Tip: Tap the “Settings” icon and you can adjust codec, bit rate, frame rate, sample rate and audio channel in the interface according to your needs and optimize the output file quality. In usual, 1280*720 video size, 1000~2000 video bitrate is proper.

STEP 3. Hit the big Convert button, the 1080p MKV to Kindle Fire HDX MP4 conversion will be started immediately. Follow the conversion process by the pop-up windows.

If you have other media files like DVD, Blu-ray library, AVI, MTS, MPG, VOB, TiVo, etc HD videos for transferring to Amazon’s new Kindle Fire HDX, Kindle Fire HD, Nook HD, Samsung Galaxy Tab 3, Galaxy Note 3, etc you can try the package tool Brorsoft’s Blu-ray Video Converter Ultimate or the iMedia Video Converter for Mac users.

See more:
Easiest way for viewing Blu-ray, DVD movies on Kindle Fire HD
Convert MKV/AVI/FLV/MOV to Kindle Fire HD video format MP4 on Mac
Enable WMV movies playable on Amazon Kindle Fire HD
Transfer 3D mts to Mac Editing Tips and Tricks
Can U add or transfer AVI/VOB/WMV to iPhone 5S/5C MP4 format
Can U Make AVI file Playable on Kindle Fire HDX

Monday, October 21, 2013

Transcoding VOB video to QuickTime MOV for editing, playback

Summary: In this article, I recommend you a best VOB to QuickTime App that can help you easily convert VOB to QuickTime MOV files with best quality & fast speed.


VOB standards for "Video Object". It is a video format to store video on a DVD disc. If you have some VOB files and want to convert VOB to QuickTime for playback on QuickTime Player or other media devices like iPad, iPhone; or you want to edit them with iMovie, FCE, Final Cut Pro, you can do as follows to change VOB to MOV files, the Apple products compatible format.

To convert VOB to MOV, without losing video quality, Brorsoft Video Converter for Mac (Mavericks, Mountain Lion, Lion supported) would take the convenience of VOB to MOV conversion as a quick and simple-accessible task. With the user-friendly software you can achieve your aim in only three steps. And if you wanna do the same job in Windows, you can get VOB to QuickTime Converter.

Note: If VOB files are still in your DVD discs, or in VIDEO_TS folder for Mac users, you need iMedia Converter for Mac for help. It’s a package tool that can help you convert BD, DVD and kinds of common video files.

1. Add VOB files to the best VOB to QuickTime App

Launch the VOB to MOV Mac converter. To add VOB files, you can just drag video from your file folders to the list in the operating window, or head to Add button to choose the file you want to convert.


2. Set output format

Click the format icon to open the format list, then choose MOV out from "Common Video" category. If you are about to use MOV files on QuickTime, iPhone, iPad, iPod, iMovie or Final Cut Pro, you can select the presets for them under a certain category.


Tip: This VOB to MOV Converter for Mac also enables to edit the video before the conversion by trimming, cropping, changing video effect, etc. Click the Edit button to do it.

3. Start to convert VOB to MOV in Mac OS

Click "Convert" to start converting your video from VOB to MOV on any Mac OS including Mavericks, Mountain lion, and Lion.

P.S. This VOB to QuickTime App can also help you convert VOB to MP4, WMV, AVI, FLV and more popular video formats to meet your needs.

More Guides:

How to import VOB files into iMovie/FCE
How to open AVI files in Sony Vegas Pro 10/11/12
Enable VOB files to work within Final Cut Pro X
VOB to iMovie: How to convert and import VOB files to iMovie
How can I add WMV and VOB files to iTunes
How to Convert and Import AVI to Sony Vegas Pro

Tuesday, September 17, 2013

Can I import Blu-ray contents to iMovie/Final Cut Express for editing

Summary: In order to make a Blu-ray directly playable and editable in iMovie or FCE program, this guide will show you how to rip convert Blu-ray movies to iMovie, Final Cut Express fully compatible format.

It's a great fun if you have a pretty large Blu-ray collection for sharing with your friends or familiars. When you have the digital copies of these movies saved on your hard drive or personal server, you may also like to edit Blu-rays in FCP, iMovie, FCE, Adobe Premiere Pro, or other nonlinear editing programs.

In this case, it comes with the problems that iMovie, FCE can’t directly ingest Blu-ray files. So, how can we rip Blu-ray movies for iMovie/FCE editing? As far as I know, iMovie/FCE is not so that picky on the formats, but it prefers AIC(Advanced Intermediate codec) in editing. Is there any quick and easy way to do this?

Download and install Brorsoft Blu-ray Ripper for Mac

It is an ideal program that can rip Blu-ray to AIC(Advanced Intermediate codec) for iMovie, Final Cut Express editing. Plus, it can also convert Blu-ray to Apple ProRes for Final Cut Pro without quality loss in a fast speed on Mac OS X (Mountain Lion included). Now download this program and follow the guide below to complete you task.

How to convert Blu-ray to iMovie/FCE

1. Insert the Blu-ray disc you want to convert into your BD drive and launch the Blu-ray to iMovie Converter. Click "Load Blu-ray" icon to import the Blu-ray movies.


2. Click the “Format” to select output format. Choose "iMovie and Final Cut Express--> Apple Intermediate Codec(AIC)(*.mov)" as the output format.


Tip: You can click “Settings” button and enter “Profile Settings” panel to adjust video size, bit rate, frame rate, sample rate and audio channels.

3. Now you can hit the Convert button on the main interface to start M2TS to iMovie/FCE conversion on Mac OS X.

Once the conversion process shows 100%, you can click “Open” button on the main interface to find the resulted AIC MOV videos for iMovie 9/10/11 or Final Cut Express editing smoothly.

Extra Tips:
How to Import DVD clips to iMovie
How to import Blu-ray to Final Cut Pro
Transfer DVD, Blu-ray and Videos to Nvidia Shield
How to Backup Blu-ray without quality loss on Mac
Backup DVD without quality loss on Mac
Can Asus MeMO Pad HD 7 play MKV/AVI/VOB/MPG files?

Thursday, August 15, 2013

Best Windows 8 Blu-ray/DVD Ripper: Rip and Convert Blu-ray/DVD discs on Windows 8

Summary: Want to convert Blu-ray/DVD in Windows 8 so that you can play your Blu-ray/DVD movies anywhere you like? Look no further! Simply follow this article to get it done!


The long-awaited Windows 8 now is there with a much better performance than its predecessors. However, if you've upgraded your PC to Windows 8, you'll be bothered by the Blu-ray or DVD playback or Blu-ray/DVD ripping issue since Windows 8 doesn't come with a default Blu-ray and DVD player and some of your programs may not work in Windows 8 any more. In this case, there is a great chance that you're looking for a Blu-ray/DVD ripper that is compatible with Windows 8 to help you rip Blu-ray/DVD in Windows 8 so that you can play your Blu-ray/DVD movies without any hassles.

Well, it's actually not a big deal. Brorsoft Blu-ray Ripper, one of the best Blu-ray/DVD Ripping softwares for Windows 8, makes converting Blu-ray and DVD movies in Windows 8 as easy as a pie. With it, you can convert BD and DVD into virtually any regular video formats like AVI, WMV, MKV, FLV, MP4, MOV, 3GP, ASF, VOB, etc. In addition, it provides hundreds of video presets for portable devices like iPhone (iPhone 5), iPad (new iPad 3), iPod (iPod Touch 5), Kindle Fire HD, Google Nexus 7, Nook Tablet, Samsung Galaxy Note 2, Galaxy Tab 2, etc. Don't hesitate to get it now and follow the easy steps below to make your Blu-ray/DVDs playable anywhere in Windows 8.

Free download the trial of Windows 8 Blu-ray/DVD Converter:


Note: The trial version is clean and with no function limit. Only a small Brorsoft logo would appear on output videos.

How to Convert Blu-ray/DVD to Windows 8 compatible video formats

1. Load Blu-ray/DVD movie

Insert the Blu-ray and DVD disc you want to rip into your computer's hard drive and run the Windows 8 Blu-ray/DVD Ripper (Note: A BD drive is needed for ripping Blu-ray discs). Then click "Disc-like" icon to add the DVD movie. As you can see, loaded files will be displayed on the left item bar and you can select your preferred audio track, subtitle, etc. ISO, IFO and DVD folder are also well supported.


2. Define output settings

Next, click "Format" bar and you'll see the format list below. Simply select one you prefer as the output format. Then click the Browse button beside Open to set a destination folder to save the converted videos.


Tip: You can click "Settings" to change the video resolution, bit rate, etc. for playback on Windows 8 with the best quality. Remember the file size and video quality is based more on bitrate than resolution which means bitrate higher results in big file size, and lower visible quality loss.

3. Start ripping

When everything is done, click "Convert" button to begin ripping your Blu-ray/DVD movie in Windows 8 and let the software do the rest for you. When the conversion completes, click Open to get the ripped videos and play them anywhere you like.

Related Guides:
How to Downscale file size of Blu-ray movies
Rip Blu-ray with Forced Subtitles
How to rip Blu-rays for playback with Android
How to transfer Blu-ray movies to iTunes (iTunes 11)
Rip and Convert Blu-ray and DVD discs to Windows 8 OS
Top 5 Blu-ray Ripping Programs Ranking and Review
Transfer files between Galaxy Note 2 and PC or Mac
Get Best Blu-ray Ripping Programs Review
Tips to Watch HD Movies on Asus Vivo Tab RT Windows RT Tablets

Wednesday, August 7, 2013

Google Nexus 7 AVI Video Playback Tips-Transferring/Playing AVI files on Nexus 7 with mp4 video format

In this article , you will find the best workflow to add and put HD AVI video files to Google Nexus 7 MP4 Playing with the TOP AVI to Nexus 7 video converter.
And then , you can also refer to the following guide about Nexus 7:

Ripping/Putting DVD movies to Nexus 7/ASUS MeMo Pad 7
Nexus 7 outsells iPad in Japan(not just the iPad mini, but all iPads)
Add AVI files on Google Nexus 7 for Playing
Rip DVD to Nexus 4/Nexus 7/Nexus 10 format mp4 playback
Best tablet 2012 Recommended: iPad 4,Nexus 7, Kindle Fire HD,.....
How to rip and enjoy DVD discs/movies on Nexus 7?

Looks like the iPad may not be the tablet titan we all thought it was. The cheaper-but-still-nice Nexus 7 tablet has overtaken the iPad in Japan, according to Nikkei report.

The Nexus 7 started shipping in mid-July and impressed a lot of tech-watchers including us by being one of the best $200 tablets around. Apple may have the most polished tablets on the block with the iPad and iPad Mini, but the Nexus 7 may be the overall best value of any tablet. And consumers around the world seem to be noticing.


Nexus 7 supported formats listed:
Music Formats: AAC, FLAC, MP3, MIDI, PCM/WAVE, Vorbis, AMR-WB, AMR-NB
Video Formats: H.263, H.264 AVC, MPEG-4, VP8
Image Formats: JPEG, GIF, PNG, BMP, WEBP

Well, AVI format is not included, so, we can't put native HD AVI videos to it for enjoying. May some users have tried to install the MX Player, but it’ s frustrated that there’s no any video player can support all the video files well especially some full HD videos. In that case, a professional video converter will be your best choice.

Here we recommend you the best Nexus 7 Video Converter, which can help you to batch convert any video files including AVI/FLV/WMV/VOB, and some even 1080p MKV, MTS, M2TS, etc to MP4 video for Nexus 7. Plus, the video converter program can also work as the best Video Editing App for Nexus 7 tablet with its video editing function like trimming, cropping, adding image/text/video watermark, adding 3D effect and more.


PS: For Mac users, you can get the best Mac Nexus 7 Video Converter, which helps you do the video conversion task on Mac OS X Lion. You can also adjust the video/audio parameters to get a perfect output for playing on Google Nexus 7.

If you wanna get the step-by-step guide on how to copy and transcode AVI/FLV/WMV to Nexus 7 MP4 video, please refer to Play HD videos on Nexus 7 with the best video player.

More Topics:

How to Convert DVD to MP4 for Galaxy Note 2

Convert Sony EX1/EX3 MP4 clips to DNxHD for Avid MC

Rip and Convert Blu-ray/DVD in Windows 8

Get movies off Blu-ray/DVD discs and onto Surface RT

How to edit 3D MTS files in Adobe Premiere Pro

Best MVI Converter- Change MVI into AVI, WMV, FLV, MOV, DVD

How to Edit MP4 files on Final Cut Pro X/7

Tuesday, July 30, 2013

Convert Canon C100 MTS clips to Sony Vegas Pro MPEG-2 video

Summary: Want to find the best way to transcode Canon C100 AVCHD video for importing and editing with Sony Vegas Pro? Read this article below and you will know how to make it.


The EOS C100 Digital Cinema Camera is an ultra-compact, highly versatile camera that will appeal to a wide spectrum of independent videographers including corporate video makers, wedding and event video producers, small video production companies, film schools, and more. However, you may face a problem when trying to import Canon EOS C100 AVCHD to Sony Vegas Pro.

As you know, Canon C100 offers 1,920 x 1,080 AVCHD; while, due to video format compatibility problem, it is may be impossible for you to import AVCHD MTS files to Sony Vegas directly who natively work with WMV or MPG files perfectly. The fastest and safest way to solve this problem is to find a useful Canon C100 MTS Converter to transcode these files to Sony Vegas Pro fully compatible format. Here is the solution for you:

First of all, download and install Brorsoft MTS/M2TS Converter

This MTS to Sony Vegas Converter is specially designed to help people edit MTS files in Sony Vegas (all versions included) by simply converting AVCHD MTS files from Sony, Canon, Panasonic camcorders to Sony Vegas readable WMV or MPG files without any quality loss.

Tips:

So if you are still complaining that when importing Canon C100 MTS files to FCP X, iMovie, Avid Media Composer, Adobe Premiere Pro, you often come across the problem that can not edit them with ease. No worries! This convert app can also help you.

Step by step to convert Canon C100 MTS files to Sony Vegas

Step 1: Launch the Canon MTS Converter and click "Add " button to import as many MTS videos as you like into AVCHD Video Converter.


Step 2: Get the dropdown menu of “Format” and then move your pointer to “Adobe Premiere/Sony Vegas”. Choose MPEG-2 as the output format from the profile list which is the Sony Vegas Pro compatible video format. Besides, WMV (VC-1) (*.wmv) and MOV (AVC)(*.mov) are also options for you.

step 3: Adjust video and audio parameters, including the Bitrate of Video and Audio, the Codec of Video and Audio, Video Size, Sample Rate, Frame Rate, Audio Channels, etc., in the Profile Settings to get Canon C100 files converted with original quality.


Step 4: Click "Convert" button to convert Canon MTS to MOV, WMV or MPG for easy MTS editing in Sony Vegas.

Tips:

If you need to convert AVCHD, MTS, M2TS videos on Mac OS X(Mountain Lion included), you can try AVCHD Converter for Mac.

See more:

Editing Canon C300 MXF in Avid Media Composer
Import Canon EOS C300 1080i MXF to Sony Vegas Pro
Canon Vixia HF G10 and iMovie Importing Workflow
Put Canon EOS C100 AVCHD footages in iMovie'11 without quality loss
Transcode Canon C100 4:2:0 AVCHD footage into Final Cut Pro X/7/6
Import and Edit Canon C100 AVCHD in FCP 6/7/X smoothly
Canon C100 Raw Footage work with Premiere Pro
Tricks for Editing Canon XA10 AVCHD MTS files in Vegas Pro
Nikon D800/D7100/D5200 MOV to Avid MC Editing Tricks
How to Get Panasonic AG-HPX500 P2 MXF into Final Cut Pro

Monday, July 22, 2013

AVI to Premiere Pro - How Do I import .AVI files into Premiere Pro CS5/CS6


 [Q]" The AVI files look and play great by themselves in Window Media Player, but when I import the AVI file into Adobe Premier in order to add a voice over and export the finished video into other formats, the playback is very jerky. So I can't seem to use these AVI files in Premiere as source video files and have them look good at all.

Any suggestions would be greatly appreciated.

Thanks in advance !"

[A]
Here is the step-by-step guide on transcocding AVI to MPEG-2 for Premiere Pro CS5/CS6 on Mac OS X with Brorsoft Video Converter for Mac. This video app can help you change AVI into a different format (e.g. .mov, .wmv, .mpg) with least quality loss. You should then be able to import the new file into Premiere with smooth editing without any trouble. If you are Windows users, please get the Video Converter. Below is how to.

Source: How Do I import .AVI files into Premiere Pro CS5/CS6

Step 1: Run AVI to Premiere Converter for Mac and you can import AVI clips to the program through "Add Video" button or "Add from folder" button. If you like, check the “Merge into one” box to join AVI clips together.


Step 2: Choose output format. This video converter offers optimized format preset for Adobe Premiere. Just click "Format" menu firstly and then follow "Adobe Premiere/Sony Vegas" to set MPG, MOV or WMV format.


Tip: If the default settings do not fit you requirement, you can click “Settings” icon to and enter "Profile Settings" panel to adjust video size, bit rate, frame rate, sample rate and audio channels.

Step 3: Click “Convert” button to start encoding AVI to MPEG-2(.mpg) for Adobe Premiere Pro CS5/CS6 on Mac OS X.

When the AVI to Adobe Premiere Pro conversion task is finished, click "Open" button to get the exported files for transferring to Premiere Pro CS5/CS6 with easy playback or editing.

Additional Tips:

1. This AVI to Premiere Pro Converter not only can help you convert .avi to Adobe, but also enables anyone with AVI files to use in any non-linear editor like Final Cut Pro, iMovie, FCE, Avid Media Composer, etc as long as transcode AVI to a recognizable format.

2. If you have problems when importing or editing your Canon, Sony, Panasonic etc, camera video files, you can check out “Brorsoft Camcorder/Camera Importing Tips” or “FCE, FCP, iMovie Column” to get your solutions.

See also:

Transcode AVI files to Avid Media Composer
How to Edit MP4 videos in Premiere Pro
Converting MP4 files to ProRes for Final Cut Pro
How to upload GoPro videos to YouTube
Upload GoPro MP4 files to After Effects
How to convert Canon XA10 video for Avid MC/Adobe Premiere Pro
Canon XA20 Workflow - FCP, Premiere, Avid, iMovie
How to Import & Edit Sony NEX-VG10 footage in Premiere Pro CS5/CS6
How to transfer avi files to Final Cut Pro for Editing
How Do I Upload Video clips from DVD to Youtube for sharing
Trouble Ripping DVD movies with Subtitles

Tuesday, July 9, 2013

How to get iMovie working with GoPro HD fotoage (.MP4 files) beautifully?

Summary: Facing issues when importing and editing GoPro MP4 files in iMovie '11/08/09? If so, follow the quick-start guide to learn how to prepare GoPro videos for editing in iMovie without quality loss.

Summary: The article shows you the best workaround for editing GoPro videos in iMovie by transcoding GoPro MP4 to iMovie native editing format - Apple Intermediate Codec.


GoPro video cameras like Surf Hero, Hero 960, HD Hero 2, HD Hero 3, etc are familiar with everyone whoever has passion for outdoor activities. The piont here, you will find it a pianful experience to import and edit GoPro HD fotoage with iMovie software. There’re some frequently asked questions quoted as below.

Q1: iMovie Won't Import MP4 Files from my Gopro
For some reason iMovie '11 won't let me import videos. Specifically, I'm trying to add MP4 files that I copied to my hard drive from my GoPro HD 960. For GoPro users, I used the R2 (720p) format. They open properly in QuickTime and VLC but can't be imported into iMovie (or iPhoto). When I select File-->Import-->Movies and browse to the directory where I saved all the .mp4 files on my hard drive, they're all greyed out. Any ideas? This is incredibly frustrating!'

Q2: GoPro video importing as poor quality into iMovie. HELP!
I used a GoPro Hero 3 to film a vacation and I am importing clips into iMovie to create a "music video," but the video is importing at a very poor quality. The video plays fine outside of iMovie. How do I fix this?

As you know, the GoPro cameras record in MPEG-4 and outputs its files as .MP4 files (the container). Files are compressed using the h.264 codec (as opposed to AAC or Xvid and DivX usually found in .AVI containers). So the files you are getting out of GoPro HD are suited to be delivered as is, which is usually not what you want. The GoPro HD being an “always-on” type of camera worn on your helmet, attached to your bike, surfboard or other, you usually end up with long sequences of footage you then need to edit down.

Since the MP4 codec is a final delivery codec it is not one you want to use for editing. To solve these problems, the quick workaround is to convert GoPro MP4 files to iMovie natively supported formats( Apple Intermediate Codec is highly recommended). Along with some help from third-party software, it can be done effortlessly. Here I share a simple guide on how to transcode GoPro HD MP4 files for iMovie 08/09/'11 editing smoothly. If you're facing the issues, read on to find the answer.

First of all, download the App- Brorsoft Video Converter Mac

Overall, the program is an easy-to-use yet all-in-one video conversion app which can be used as a GoPro camera video converer under OS X Leopard (10.5), Snow Leopard (10.6), Lion (10.7), Mountain Lion (10.8). It is free, clean and safe to install and use. With it, you can effortlessly transcode GoPro MP4 to Apple Intermediate Codec, which will create an iMovie friendly file format keeping the Gopro orginal quality. Besides iMovie, this software can also export DNxHD for Avid, MPEG-2 for Sony Vegas, Premiere Element, AVI for Pinnacle Studio, ProRes for FCP, more NLE systems for native editing. Just download it and follow the tutorial below to get the work done.

Convert/Import GoPro HD MP4 files into iMovie

Step 1: Add Gopro MP4 video files

Install and launch the GoPro HD MP4 converter and load source MP4 clips to it.


Step 2: Choose output format

Hit the "Format" bar and select iMovie and Final Cut Express > Apple InterMediate Codec(*.mov) as output format on the drop-down menu.


Tip - Profile Settings:
In case the default settings do not fit your requirement, you can click “Settings" button and enter “Profile Settings" panel to adjust video size, bit rate, frame rate, sample rate and audio channels.

Step 3: Start GoPro MP4 to iMovie AIC conversion

Click “Convert" button to start encoding Gopro HD MP4 video to Apple InterMediate Codec for importing to iMovie 08/09/11. When the conversion task is finished, click “Open" button to get the exported files and then import the converted GoPro MP4 files into iMovie to do further editing without problems.

Additional Tips:
If you want to edit GoPro video in Final Cut Pro X or FCP 7/6, you just need to choose the "Final Cut Pro > Apple ProRes 422 (*.mov)" as output format in the second step; For Avid Media Composer, choose "Avid Media Composer > Avid DNxHD(*.mov)" as output; For Adobe Premiere Pro or Vegas Pro, choose Adobe Premiere/Sony Vegas> MPEG-2(*.mpg) as output.

GoPro Video Preparing Quick-Start Guides for Editing:

GoPro and Avid MC workflow | GoPro to FCP 7 Workflow | GoPro files and Premiere Pro | GoPro MP4 in Pinnacle Studio | GoPro footage editing with Windows Movie Maker

More Articles:

Canon Vixia HF R42 and Final Cut Pro Importing Workflow
Best way for Editing Canon MXF clips in Avid Media Composer
How to Get Avid MC work with GoPro camera video files
FCP set up to Import Sony PDW-F800 XDCAM footage
Transcoding Canon XF305/XF300 50Mbps MXF to Sony Vegas Pro
How to edit 4K video in Final Cut Pro 7 and FCP X smoothly
Cannot import MOV video off of Nikon 1J1/1J2/1J3 to FCP X/7

Thursday, July 4, 2013

4K Camcorder Video Converter - Transcode 4K videos for editing in Final Cut Pro X/7/6 smoothly

Summary: With the 4K Camcorder video converter, you can easily import and edit Sony, Blackmagic, GoPro, Panasonic 4K Camcorder AVCHD/MTS/M2TS/MXF videos in Final Cut Pro X or FCP 7 by transcoding to Apple ProRes format.


Are you got a 4K camcorder? When you traveling with your friend or family, I think you often take up the instantaneous which the camcorder pats to like. Before you share it with others, you may edit these HD video in FCP 7 and FCP X. FCP 7 and FCP X can’t import your camcorder video? What a pity.

What video format can import to FCP 7 and X? You can get answer from Apple’s official website. This link is about Final Cut Pro X supported video and audio format:

http://www.apple.com/finalcutpro/specs/#supported-formats-and-io

Note 1: Import, export, and edit MXF-wrapped media from archives or asset management systems via third-party plug-ins.

Note 2: Background transcode original media to ProRes 422 or ProRes Proxy for better performance.

The latest version of the FCP X support import video resolution up to 5K, why FCP 7 and FCP X can't import 4K video files? Obviously, resolution isn’t a problem, video format is a major cause. Different video format has different video and audio codec, FCP X and FCP 7 doesn’t support all formats importing. Such as FCP X and FCP 7 can’t import some 4K AVCHD/MTS/M2TS video files, FCP X and FCP 7 can’t import 4K MXF video from Sony, Blackmagic, GoPro, Panasonic and Canon etc.

So, How to edit 4K video in Final Cut Pro X and FCP 7?

Through the introduction of apple.com, we can get a best solution for 4K video, that is transcode transcode 4K video to Apple ProRes, which ensures maximum editing quality and efficiency when working with Final Cut Pro X or FCP 7. To get the work done, we need to get some help from a 4K video to ProRes Converter. Here Brorsoft Video Converter for Mac is a nice choice to achieve your goal smoothly. With it, you can effortlessly transcode Sony, Blackmagic, GoPro, Panasonic, Canon 4K video to ProRes 422 codec which ensuring the best results when using FCP X/7. This will help you import the file correctly and saving the rendering time. Below is a brief guide for you.

The 4K Video Converter supported 4K Camcorders:

Sony: FS700, CineAlta F5, CineAlta F55, CineAlta F65

Canon : EOS C500, EOS-1D C DSLR,

Astrodesign AH-4413, Point Grey Flea3 8.8 MP, GoPro HERO3 Black, Nvidia GTX Titan, AMD Radeon HD 7970

Guide: How to Convert 4K video to FCP X/7 ProRes 422

Step 1: Load 4K video to the 4K to FCP Converter

Click "Add" or "Add from folder" and import the 4K video into this software. Besides ProRes, 4K Video to Mac converter Mac can help you transcode 4K video to DNxHD, Apple Intermediate Codec, MPEG-2, WMV for Avid, iMovie, FCE, Premiere Pro for Mac importing natively.


Step 2: Choose output format

Click on "Format" bar and locate the appropriate output profile. move mouse cursor to “Final Cut Pro > Apple ProRes 422 (*.mov)” to set a FCP 7/X best codec.


Step 3: Start transcoding 4K video to ProRes 422

Click Convert button to start Sony, Blackmagic, GoPro, Panasonic and Canon 4K video to FCP 7 and FCP X ProRes 422 conversion.

After conversion, locate and select the file you want to import, then click Import for further editing in Final Cut Pro 7/X smoothly. Now, you can edit 4K video on Mac in Final Cut Pro 7 or FCP X or FCP 6 natively, smoothly without any problem. Video and audio quality and synchronization are perfectly guaranteed.

Some more helpful features of the app:

1. Settings- click to set video resolution(1920×1080/1440×1080/1280×720/720×480), bitrate(from 1Mbps to 20Mbps), frame rate (24p/30p)

2. Editor (next to “Add” icon)- click to set deinterlace, denoise, mute, volume up, trim, crop, etc.

Tips: Before you try to do the conversion, if you are also a FCP X user, please make sure that you have installed the Apple ProRes Codec manually since the FCP X asks users to install it by themselves.

More Topics:

FCP set up to Import Sony PDW-F800 XDCAM footage

Transcoding Canon XF305/XF300 50Mbps MPEG-2 4:2:2 codec MXF to Sony Vegas Pro

Sony EX3 MP4 files to ProRes 422, ProRes 422 HQ For FCP X

Help with Sony EX3 MP4 footage in iMovie

Add DVD movies (DVDs, IFO, ISO) on HUAWEI Media Pad 7”

Load HD videos(FLV/AVI/MKV/WMV/TiVo) to HUAWEI Media Pad 7"

Tuesday, July 2, 2013

How can I handle H.264 MOV files from D3200/D800/D5100 in iMovie easily?

Summary: When you try to import camera raw H.264 MOV files from Nikon D800, D3200, D5100 to iMovie, you may find the there are some importing or editing issues. Read on the article to get the solution.

Many Cameras like Nikon D5100, D3200, D4, D800 record 1080p H.264 MOV footages. The HD video recording function helps you perfectly capture every moment of tears and laughter in your life and keep the unique memory forever. Have you got one H.264 MOV Camera? If so, you must like taking and playing the HD recordings with your family and friends. However, something painful is that you can't import Nikon H.264 MOV to iMovie for editing on your Mac smoothly.

In fact, the reason behind that is Full HD "MOV" movie files created by Nikon DSLRs use the H.264 codec for the video. Generally, .mov is friendly for iMovie, but H.264 is a delivery codec rather than editing codec. If you have got MOV videos from Nikon D3200/D800/D5100 and suffered the headache from dealing with these files, the program Brorsoft Video Converter for Mac, a top Mac Nikon MOV to iMovie Converter, which will get you out of trouble effortlessly in editing Nikon MOV files in iMovie 08/09/'11. With it, you not only can easily transcode H.264 to Apple InterMediate Codec .mov for iMovie program within a few clicks, you can also encode Nikon/Canon/Panasonic/Sony/JVC camera or camcorder videos to Apple ProRes for FCP, DNxHD for Avid Media Composer, MPEG-2 for Adobe Premiere Pro, etc on Mac OS X(Lion, Mountain Lion included). I have used it to covert many H.264 MOV files on my MacBook. It works fast and keeps the original quality in 1080 30p/24p.

[How-to]: Transocde Nikon D3200/D800/D5100 H.264 MOV recordings to AIC for iMovie

Step 1: Install and run the Nikon H.264 MOV Converter on Mac, and then click "Add files" icon to import your H.264 MOV files directly from your camera or the copied folder on the desktop.


Step 2: Hit the Format box to select the specially designed video codec for editing in iMovie: iMovie/FCE --> Apple InterMediate Codec(AIC) (*.mov).


Step 3: (Optional) Adjust the video and parameters, including the Bitrate of Video and Audio, Audio, Video Size, Sample Rate, Frame Rate, Audio Channels, etc., by clicking the Settings buttion on the main interface.

Tip: The 1920*1080 as video size and 30fps for NTSC area while 25fps for PAL area as Frame Rate are the best settings for editing in iMovie.


Step 4: Click the arrow button to start transcoding Nikon H.264 MOV to AIC for iMovie as well as Final Cut Express immediately.

After the H.264 MOV to AIC conversion finished, you can easily transfer your 1080p footages from Nikon D3200/D800/D5100 to iMovie for further editing without any problem.

Related Guides:
How to transcode Nikon MOV to ProRes for FCP
How to import Nikon MOV to Premiere Pro
How to upload Nikon MOV videos to Sony Vegas
Encodeing MTS to WMV for Windows Movie Maker
Transcoding AVCHD MTS to ProRes for FCP 7
Make 1080 50p/60p MTS clips playable for iMovie
Upload Canon XF100/XF105/XF300/XF305 MXF to Sony Vegas Pro 11/12
How to convert AVCHD to MP4, MTS to MPEG-4
Converter AVCHD MTS files to Pinnacle Studio Tips

Thursday, June 27, 2013

RX100 Video Question- How to import Sony RX100 MTS to Premiere, Pinnacle


Summary: Have got a Sony Cybershot DSC-RX100 and want to import/edit AVCHD .mts footages in Adobe Premiere Pro, Pinnacle Studio without rendering; check out the guide to learn how to convert Sony RX100 AVCHD MTS to Premiere Pro, Pinnacle compatible video format.

Sony Cybershot DSC-RX100 is wonderful to be taken to record full HD videos(AVCHD) when you’re travelling. Whereas, when you wanna edit those AVCHD MTS footage in Adobe Premiere or Pinnacle Studio on your PC before sharing with friends, problems may occur: the Premiere handled with the 1080p files so slowly, and couldn't edit the MTS videos smoothly. When tried the Sony RX100 AVHD footage in Pinnacle Studio, the files still can’t be handled perfectly. Well, we’ve out the solution to fix the AVCHD (.mts/.m2ts) footage in Adobe Premiere, Pinnacle Studio incompatibility issues. Go through the article to check out the solution.

So how to import/load video clips from Sony RX100 into Adobe Premiere, Pinnacle for editing smoothly? The reason you can't edit Sony AVCHD MTS files in Premiere or Pinnacle smoothly is due to the format and codec. AVCHD MTS is a delivery codec rather than editing codec. The best method to solve those problems is to transcode Sony AVCHD .mts to Pinnacle and Adobe Premiere most compatible format, for instance, the WMV with Brorsoft MTS/M2TS Converter.

Overall, the Sony Video Converter comes with supports for a wide range of video editing software and media devices, including Adobe Premiere, Sony Vegas, Cyberlink PowerDirector, Avid, Magix Movie Edit Pro, and Windows Movie Maker. It helps you convert Sony as well as Panasonic, Canon AVCHD recording to any editable format like WMV, MPEG-2, AVI HD, Avid DNxHD as you need without any quality loss. If you're using a Mac, please turn to its equivalent Mac version – MTS/M2TS Converter Mac, which can help you solve the AVCHD and Mac incompatibility.

How to Convert Sony RX100 AVCHD footages into Adobe Premiere/Pinnacle for editing smoothly


Step 1. Free download and run the MTS Converter and import Sony AVCHD mts files to the program.

Tip: You can merge the MTS clips with this MTS joiner by checking the “Merge into one” box.

Step 2. Hit the Format box and select proper format.

a. For Adobe Premiere Pro, “Adobe Premiere/Sony Vegas > MPEG-2 (*.mpg)” is the best output format. “WMV (VC-1) (*.wmv)” is also the proper one.


b. For Pinnacle Studio, choose “HD Video -> AVI HD Video (*.avi)” as output, which seems to be the best one due to the great video quality but small size. Of course, MPG, MP4, WMV are also the proper formats for Pinnacle.


Step 3. Click "Settings" button if you’d like to customize advanced audio and video parameters like Video Codec, aspect ratio, bit rate, frame rate, Audio codec, sample rate, audio channels.


Step 4. Click the convert button; it will start transcoding MTS for importing to Pinnacle Studio, Premiere Pro immediately. Soon after the conversion, just click “Open” button to get the generated files for edit in Pinnacle Studio, Premiere perfectly.

More topics:

Sony DSC-HX30V AVCHD Files to FCP 7

Convert Sony Cyber-shot DSC-TX10 AVCHD to FCP X

Convert 1080/50p AVCHD to MPEG-2 for Premiere Elements

Transcode 1080p AVCHD to MPEG-2/WMV for Premiere Pro

Convert Sony Cyber-shot DSC-HX100V AVCHD to iMovie

How to solve issues Sony XDCAM EX files not working FCP

Load DSC-TX55/TX66/TX10 AVCHD footage to Premiere Pro

Editing AVCHD .mts/m2ts files in Pinnacle Studio Smoothly

Windows Movie Maker: How to Import & Edit MTS files

Get AVCHD footage from Sony FS700 into Avid Media Composer on Mac

Transcoding and Deinterlacing Sony DSC-WX80 to FCP 6/7

Monday, June 17, 2013

AVI and FCP X-Converting AVI files to Apple ProRes for editing in Final Cut Pro X smoothly


Summary: To get Final Cut Pro X work with AVI files beautifully, the easy workaround is to transcode AVI to Apple ProRes, which easures the best results when using in FCP X. Here is how-to.


We usually saw Final Cut users encounter importing issues when attempting to edit AVI files with Final Cut Pro X. Let's see some frequently asked questions on this.

Q1: FCP X can't import AVI's???

I had been messing around with some AVI files I had from around 8 years ago and noticed I cannot import them into FCPX - but they import just fine into iMovie. Seems kind of strange that the entry level program can do something that the higher end program can't.

Q2: Final Cut Pro X AVI Problems.

When I import avi video into Final Cut, the preview screen won't work whatsoever, it just stays black, even when the video is fully imported. As soon as I try to play it, Final Cut Pro freezes and I have to force quit it. The rest of the program seems to work fine.

Firstly, does anyone know why it might be doing this and what I can try to solve it?

Secondly, if I can't solve it, can anyone recommend an alternative program I can use?

Wanna to import AVI files to Final Cut Pro X for editing but FCP X doesn't let you do it? Final Cut Pro is famous for its powerful editing features. Unfortunately, AVI is not supported by FCP X. To get AVI files and Final Cut Pro X to play nicely, the easy workaround is to transcode AVI to Apple ProRes, which ensures maximum editing quality and efficiency when working with Final Cut Pro X. Along with some help from professional AVI to ProRes Converter, it can be done. To help those who wanna edit .avi files in Final Cut Pro X, here I share with you a simple guide on how to convert AVI to Apple ProRes MOV format for FCP X.

First of all, download the app - Brorsoft Video Converter for Mac

Overall, the program is a professional yet all-in-one video conversion tool. With it, you can easily rewrap all AVI files to ProRes 422, ProRes 422 HQ or 4444 for using in Final Cut Pro X/7/6. It also provides simple video editing functions for you. Besides, the Mac video converter can convert HD videos from HD camcorders or DVs (like JVC, Panasonic, Sony and Cannon) for editing in Final Cut Pro, Final Cut Pro X, Final Cut Express, iMovie, Avid MC, Adobe Premiere Pro etc. Just download it and follow the tutorial below to get the work done.

Guide: Transcoding AVI to Apple ProRes for Final Cut Pro X

Step 1: Launch the Mac ProRes Conversion program; click "Add" button from main menu to browse your computer hard drive and select the AVI files you want to convert. Or you can easily drag-and-drop files into this application for converting. You can also load video files formatted in .mkv, .wmv, .flv, .vob, etc.


Tip: You can check the “Merge into one” box to merge several avi video files together for easier editing.

Step 2: Click the format bar, and move mouse cursor to "Final Cut Pro > Apple ProRes 422 (*.mov)" as output format.


Step 3: Click "Convert" button to start encoding AVI files to Apple ProRes MOV for Final Cut Pro X under Mac OS Mountain Lion.

Some more helpful features of the AVI to FCP Converter for Mac

1. Settings- click to set video resolution(1920×1080/1440×1080/1280×720/720×480), bitrate(from 1Mbps to 20Mbps), frame rate (24p/30p)


2. Editor (next to "Add" icon)- click to set deinterlace, denoise, mute, volume up, trim, crop, etc.

Once the AVI to ProRes 422 conversion is done, you can transfer your AVI files into Final Cut Pro X for editing smoothly on Mac with ease.

Additional Tips
1. If you meet any importing & editing problems with kinds of popular video edit programs like FCP, FCE, iMovie, Adobe Premiere Pro, Avid Media Composer, etc, you can link to Video Editors Tips and Tricks colum to get the solution.

2. If you are a Panasonic, Canon or Sony user, you can get the Full HD video camera tips to fast solve the MOV, AVCHD .mts/m2ts, MXF importing and editing issues.

Related Guides

Edit AVCHD MTS, M2T, M2TS files in Final Cut Pro

Tip for Importing MTS files to Windows Movie Maker

Using GoPro HD videos in Windows Movie Maker

Can't import AVI files into Premiere Pro CS5/CS6?

How to: Convert MKV to Final Cut Pro for editing and sharing

How to Convert MKV files to editi with FCP 6/7/X for sharing

Thursday, June 13, 2013

Galaxy S4 AVI file player-Converting/Compress AVI files to fit your Galaxy S4


Summary: Having problems when playing AVI files on Samsung Galaxy S4? The article explains why and how to get all AVI videos and Galaxy S4 to play nicely.


The Galaxy S 4's 5-inch 1080p HD screen definitely bring you an extraordinary movie watching experience. The jelly bean handset supports WMV9, WMV7, WMV8, H.264, MPEG4, Xvid, DivX, H.263, and VP8 video codecs. Most of the time you can enjoy AVI videos on the Galaxy S4 smoothly, but you may also encounter troubles when playing AVI files on Galaxy S4. That is because AVI is a container format. It can be encoded by different codecs, some of the codecs may not compatible with Galaxy S4, so you’ll have problems when playing these AVI videos on your Galaxy S4, even with some popular Android video player like MX player, Mobo, etc. If you’re confused about this and have no idea, here you will find the best solution.

To watch those uncompatible AVI files on Samsung Galaxy S4 successfully, the best solution is to encode/re-encode AVI to Galaxy S4 supported video formats. Here is how:

In the first place, free download Brorsoft Video Converter app. Overall, the program can be used as an all-in-one video conversion app for for Galaxy phones and tablets. With it, you can easily transcode AVI to MP4 videos for Galaxy S4 with high quality and fast encoding speed. Besides AVI, it can also help you transfer almost all 1080p/720p HD videos including MKV, VOB, MPG, MOV, TiVo, MTS etc. for Galaxy S4, Galaxy Tab 2 10.1/7.0, Galaxy Note 2, Galaxy S3 and other Android os tablets. It has an equivalent Mac version entitled Brorsoft Video Converter Mac, which can convert .avi videos to Galaxy S4 on Mac OS X (Include Lion and Mountain Lion).

How to Convert AVI videos to Samsung Galaxy S4 supported video formats

Step 1: Add AVI Video Files

Install and run the Galaxy S4 Video Converter to your PC, clic “Add Video” or “Add from folder” to import your source AVI videos. Batch conversion is supported so that you can add multiple files.


Step 2: Select output format for Samsung Galaxy S4

Choose output profile for Galaxy S4. Here I recommend you "Samsung > Samsung Galaxy S III Video (*.mp4)" which is a format specially designed for Galaxy S3 but also works for the S4.


Tip:
If you like, you can click on Settings you could easily set bitrate, frame rate, codec, channels, sample rate, etc to adjust parameters that affect video quality and file size for the video you prefer. Keep in mind that bit rate higher results in big file size, and lower visible quality loss, and vice versa.


Step 3. Start converting AVI to MP4 for Galaxy S4

In the end, go back to the main interface and click the “Convert” button to start converting AVI video files for playing on Galaxy S4. Once the process completes, just click “Open” to find the Galaxy S4 playable MP4 videos after the conversion and transfer them to your device with ease.

If you have no idea about Samsung Galaxy S4 file transfer, refer to the guide "How to transfer media files to Samsung Galaxy S4" to learn more.

Additional Tips:

If you are considering to get a powerful all-in-one tool to convert videos, Blu-ray movies and DVDs to your Samsung Galaxy S4 or other devices like iPad, Google Nexus 10/7, Kindle Fire HD, Samsung Galaxy Note 2, Galaxy S3, Galaxy Tab 2 10.1 at the same saving time and effort, the all-in-one Blu-ray Video Converter Ultimate program will a nice choice for you. If you are running a Mac OS X computer, iMedia Converter Mac is the alternative.

See Also:

How to Convert DVD to MP4 videos for Samsung Galaxy S4
How to Rip Blu-ray for playback with Samsung Galaxy S4
How to Play MKV, AVI files on Samsung Galaxy S4
Enable Galaxy S4 to play MPG/MPEG videos
Convert and transfer Blu-ray movies to Galaxy S4 with best quality
Transfer movie Blu-ray to Asus Transformer Pad Infinity TF700
Convert YouTube Movies into a format that can be played on Surface RT/Pro
Enable Galaxy Tab 3 to play AVI files smoothly

Purchase Blu-ray Ripper for Asus Infinity TF700 - Transfer movie Blu-ray to Asus Transformer Pad Infinity TF700


Summary: The article guides you how to rip and convert Blu-ray movies to Asus Transformer Infinity TF700 supported video formats on Mac and Windows so that you can view Blu ray movies with Asus Infinity TF700 anywhere.


Asus Transformer Pad Infinity TF700, as one of the best Android tablets, comes with a 10-inch display and its IPS screen sports a 1,920x1,200-pixel resolution, which is wonderful for movie or TV shows enjoyment. If you’re wondering how people are converting their Blu-ray's to a video file compatible with the Infinity, read on and you can find a simple way to achieve your goal.

For getting Blu ray movies onto Asus Infinity TF700, a Blu-ray encoding software is necessary. I’ve tried at least there applications but the picture quality was not very good at all, it would pixelate in high motion scenes that is just very annoying to me. I tried the built in profile and even built a couple from scratch and they all came out the same. Well, when I tired Brorsoft Blu-ray Ripper, it works perfectly with the excellent picture/image quality.

The program can be used as a great Blu-ray Converter for Asus Infinity TF700, Transformer Prime TF201, Transformer TF101, Transformer Pad TF300, Nexus 7, Nexus 10, Kindle Fire HD, etc. In fact, it’s a yet professional Blu-ray to Android ripping tool; in other word, it enables you to play Blu-ray on all Android based Tablets. The output quality is excellent and the encoding speed is very fast. If you are a Mac user, please get the Mac Blu-ray ripper for ripping Blu-ray to Transformer Infinity on Mac OS X(Mountain Lion included). Now download and follow the below step-by-step guide for you.

Guide: Converting Blu-ray for playback with Asus Infinity TF700

Note that the guide below uses Blu-ray Ripper for Windows screenshots. The way to finish your task on Mac is almost the same. Just make sure you've downloaded the right version.

Step 1. Launch the Blu-ray to Asus Infinity TF700 Converter, insert the Blu-ray disc to your computer drive, and then load your blu-ray movies to this program. You can also add ISO file, IFO file or Blu-ray/DVD folder.


Step 2. Now select the output format for playback on Asus TF700, You can get optimized videos for Transformer Pad Infinity TF700 under Android > Asus Transformer Pad Infinity 700 Full HD Video (*.mp4).


Tips:

1. Select the main movie, and set desired language from drop-down list of “Subtitles” box.


2. If you like, you can click "Settings" to change the video encoder, resolution, frame rate, etc. as you wish. For watching videos on the Asus Transformer tablets, 720p with 1500~2500kbps is just all right. I found the file size and video quality is based more on bitrate than resolution which means bitrate higher results in big file size, and lower visible quality loss, and vice versa.


Step 3. Finally, click "Convert" button to start ripping Blu-ray files to .mp4, the Asus Infinity TF700 best video format.

Once the conversion completes, you can transfer the result videos to your Asus Tablet. In this way, you can play Blu-ray movies on Asus Transformer Pad Infinity TF700 and enjoy them on the go.

Additional Tips:

If you are looking for a powerful all-in-one tool to convert videos, Blu-ray movies and DVDs to your Google Nexus 4, Google Nexus 10/7, Kindle Fire HD, Samsung Galaxy Note 2, Galaxy S3/S4, Galaxy Tab 2 10.1, Nook HD, Transformer Prime, etc at the same saving time and effort, the all-in-one Blu-ray Video Converter Ultimate program will be a nice choice for you. If you are running a Mac OS X computer, iMedia Converter Mac is the alternative.

See also:

Play MKV to Asus Eee Pad Transformer Prime
Play DVD on Asus Eee Pad Transformer Prime
Transfer 1080p HD video to Asus Eee Pad Transformer Prime
Convert MKV to Asus Transformer Pad 300 with full screen playback
Rip Blu-ray to Asus Transformer Pad TF300T with forced subtitles
Play All AVI files on Asus Transformer Prime/Infinity TF700
Convert MKV files so that we will work on a Nokia Lumia 520
Ripping DVD movies to Sony Xperia Tablet Z

Monday, June 3, 2013

Final Cut Pro: Importing/Editing AVCHD footage in MTS, M2T, M2TS file format smoothly


Summary: Facing issues when importing and editing AVCHD MTS, M2T, M2TS files Final Cut Pro HD/6.0/7/X? Get the best Mac MTS to ProRes Converter to achieve your goal smoothly.

AVCHD (Advanced Video Coding High Definition), often with the file extension of mts, m2ts or mt2, is a professional digital recording format for Sony, Panasonic, Canon and more camcorders and cameras. Though Final Cut Pro HD/6.0/7/X announced to support AVCHD video files, some AVCHD files still can not imported to Final Cut Pro HD/6.0/7/X: AVCHD support is available only on Intel-based Macintosh computers; FCP only supports AVCHD camcorders typically connect to computers via USB 2.0, not FireWire; DVD-based AVCHD camcorders are not currently supported by Final Cut Pro HD/6.0/7/X; Standard definition video recorded with AVCHD camcorders cannot be accessed in Final Cut Pro HD/6.0/7/X.

In order to import all kinds of AVCHD to Final Cut Pro HD/6.0/7/X successfully, it is better to convert AVCHD in MTS, M2T, M2TS to Apple ProRes 422 which works well with Final Cut Pro HD/6.0/7/X.

The following guide just aims to provide your a step by step guide on how to convert AVCHD in MTS, M2T, M2TS to ProRes with almost no loss of video and audio quality.

Transcoding AVCHD in MTS, M2T, M2TS to ProRes MOV for Final Cut Pro

The quick workaround is to use the easy-to-use yet professional app called Brorosft MTS/M2TS Converter for Mac which is compatible with OS X Leopard (10.5), Snow Leopard (10.6), Lion (10.7), Mountain Lion (10.8). It is free, clean and safe to install and use. With it, you can effortlessly transcode AVCHD MTS, M2TS, M2T to ProRes MOV for Final Cut Pro HD/6/7/X, and it works well and converts flawlessly. Below is how.

Step 1: Load AVCHD footage to the Mac ProRes Converter[b]

Use a card reader to copy and transfer the .mts, m2ts files to iMac hard drive disk, run Mac MTS Converter as the fast Mac MTS to ProRes Converter, and click the “Add” button to load the .mts videos. You can also use the drag-and-drop method to load the 1080p .mts files to the application UI.


[b]Step 2. Choose outout format


Press “Format” option and navigate the mouse cursor to choose “Format > Final Cut Pro > Apple ProRes 422 (*.mov)” as the best codec for FCP 6/7 and FCP X on Mac.

Step 3. You can click “settings” button in the main interface to customize the output video’s parameters, such as resolution, frame rate, etc.


Step 4. You can edit the MTS video before you convert AVCHD MTS/M2TS/M2T to ProRes MOV.

By clicking “Edit” button, you can trim, crop the video, or add watermark and adjust effect to the videos which you will convert.


Trim – Choose to reserve the part you need. Just choose the chapter which you need to trim, to set “start time” or “end time”, type the portion which you want to save.

Crop – Remove black edges of your video or just get the scale of this video you want.

Effect – Adjust the effects by adjusting the parameters, such as:

1) Deinterlacing – If there are some stripes on the picture, you can check this option to make a better picture effect. (Checked by default)

2) If you want to get 3D effect, just enable this fuction and do settings:

Step 5. Start the conversion

Click the “Convert” icon under the preview window, and the Mac MTS to ProRes Converter will start transcode AVCHD in MTS, M2T, M2TS to Prores MOV for FCP on Mac.

After the conversion, click the “Open” button to locate converted files, then load ProRes .MOV files in FCP (X). Now you can successfully and easily import AVCHD footage to Final Cut Pro HD/6.0/7/X for editing with best quality.

Additional Tips:

1. If you are also a FCP X user, before you try to do the conversion, don’t forget to make sure that you have installed the Apple ProRes Codec manually since the FCP X asks users to install it by themselves.

2. If you want to edit AVCHD MTS in iMovie, you just need to choose the “iMovie and Final Cut Express -> Apple InterMediate Codec (AIC) (*.mov)” in the second step.

3. If you want to batch conversion, the professional iMedia Converter for Mac is the best choice for you.

Related Topics:

Import Panasonic AG-HPX3100 P2 MXF to Final Cut Pro

Convert Canon 700D (Rebel T5i) MOV to ProRes for FCP X/7/6

Handling Cyber-shot DSC-WX80 1080 60i MTS clips with FCP 6/7

Converting Panasonic P2 Card MXF to Apple ProRes for Final Cut Pro 7/X

Solving Sony Cyber-Shot WX80 and Final Cut Pro Importing Issues

Transcode MP4 files from Sony PMW-350 to Adobe Premiere Pro CS4/CS5

Monday, May 27, 2013

Edit VG30 mts in FCP-Transcode Sony NEX-VG30 AVCHD to ProRes for Final Cut Pro 6/7/X

[Q]:I purchased a Sony camcorder VG-30 and I thought it would have give no problems at all with fcp, it looks like it doesn't work.

Does anybody know a way out?

[A]:
Hi, guys! Following the below guide, you can smoothly import and edit Sony NEX-VG30 MTS files in Final Cut Pro 6/7 and FCP X by using a TOP MTS Converter for Sony VG30 and FCP, which can help you to simply relize Sony AVCHD MTS/M2TS files to Apple ProRes MOV format Conversion.

Sharing many of the pro-oriented enhancements of the NEX-VG900, the Handycam NEX-VG30 succeeds the acclaimed NEX-VG20. With a resolution of 16.1 effective megapixels, the camcorder’s Exmor™ APS HD CMOS sensor assures outstanding image quality with the range of interchangeable E-mount lenses.

*16.1 mega pixels HD CMOS Sensor
*Full HD 60p/24p(NTSC) progressive movie recording
*High contrast XGA OLED Tru-Finder
*Quad Capsule Spatial Array Microphone for high-quality stereo and 5.1ch sound

While, after recording, we may need to import Sony AVCHD footages to Final Cut for editing, but, Sony NEX-VG30 recorded videos are in AVCHD format, which is not compatible with many editing software, such as FCP 6/7, FCP X and FCE on Mac. Final Cut software doesn’t supports AVCHD well- it takes much time to render.

As far as we know the 1080 60p AVCHD flies from Sony VG30 would not be ingested natively into Final Cut Pro 6/7 and FCP X. Even if you can apply the Log and Transfer plug-in with FCP 7 to import the AVCHD footages successfully, you would actually not be satisfied with the transcoded Apple ProRes 422 LT files(The Log & Transfer can do the AVCHD to Apple ProRes422 LT conversion work for you as a background converter). So, any solution to solve the problems?

Want to find the answer? The best solution is to convert Sony NEX-VG30 AVCHD MTS footage to ProRes codec MOV format on Mac OS X, which is best supported by FCP 6/7/X. The below is a brief guide for beginners.

[Full Guide] Loading and Transcoding Sony NEX-VG30 MTS to Final Cut Pro (X):

Step 1. Download Brorsoft MTS/M2TS Converter for Mac. This professional Mac AVCHD Converter can help you convert Sony VG30 AVCHD to FCP Apple ProRes 422 MOV format effortlessly without quality loose. Besides, more output formats like AIC for iMovie/FCE, DNxHD for Avid MC, MPEG-2 for Adobe Premiere Pro, etc are also supported.

Step 2. Click “Add Video” to load the .mts files from Sony VG30 Camcorder to the Mac Converter.


Step 3. Click format bar to choose the output format. Click and choose Final Cut Pro -> Apple ProRes 422 (*.mov). Well, Apple PreRes 422(HQ), Apple ProRes 422(LT), Apple ProRes(Proxy), etc are all the proper choice for you.


Note: If you are a FCP 6 or former version user, you only can choose ProRes 422 and ProRes 422 HQ as the output format.

Step 4. You can click the Settings icon to do some audio/video settings. We recommend 1920*1080 as video size and 30fps as video bitrate for later easy editing in Final Cut Pro.


Step 5. Finally click convert button to start the Sony VG30 AVCHD to ProRes 422 conversion for Final Cut Pro 6/7 and FCP X with the top AVCHD to ProRes Converter on Mac OS X. After converting, you can import NEX-VG30 MTS files to Final Cut Pro 6/7/ X for editing as you want.

If you have problems when importing or editing your Canon, Sony, Panasonic etc, camera video files, you can check out "Brorsoft Camcorder/Camera Importing Tips" or "FCE, FCP, iMovie Column" to get your solutions.

Related Guide & Tips:

Panasonic 1080 60p AVCHD and FCP workflow
Converting Sony 60P MTS files to edit in iMovie
Easily edit Sony PMW-F55 XAVC video clips in iMovie 11
GoPro HD movies with Adobe Premiere Pro compatibility?
Get Sony NEX-VG900 1080/60P AVCHD to work with FCP
Convert Sony NEX-VG30 AVCHD to Apple ProRes for FCP X
Import Sony NEX-FS700 AVCHD clips to Final Cut Pro 7