About the Canon XF 305 and XF 300The XF300-series camcorders employ the XF Codec, an MPEG-2 4:2:2 50Mbps codec for native 1920 x 1080 HD video recording onto affordable, universally available Compact Flash (CF) cards. Uniting video, audio and metadata into a single file, the Canon XF305 and XF300 use an MXF (Material eXchange Format) File Wrapper, a widely supported open-source format, to maximize compatibility with existing industry infrastructure and non-linear editing (NLE) systems.
Canon Adds 3D Features to XF305 and XF300 Camcorders to Function Better with 3D Camera Rigs
3D Shooting Capability with Axis Shift-Canon’s new 3D Assist Function facilitates the setup of two XF305 or XF300 camcorders when gen-locked together to capture HD 3D. The firmware lets users perform an OIS Lens Shift to aid in aligning camcorders -- and a Focal Length Guide lets you display the zoom position and help calibrate the settings. These new adjustments can be done through the menu system while cameras are mounted to a 3D rig or tripod. Once aligned, the amount of the angle-of-view change is displayed after zoom adjustment, preventing camera misalignment and simplifying adjustment. This is similar to the 3D shooting functionality found in the Canon’s XF105 and
XF100 models.
Double-Slot Recording
This allows the camcorders to record footage simultaneously to both memory card slots for instant backup of important footage. Ideal for use in production environments to ensure multiple copies are secured for each take.
 About Transcoding Canon XF305/XF300 MXF Files to FCP X for making XF 305/ XF 300 50Mbps MPEG-2 4:2:2 codec MXF working with FCP X Mac.
Those who are eager for putting MXF footages to FCP X but bothered by the incompatiblity problem of MXF and FCP X. Here recommend a Top MXF to FCP X converter named
Brorsoft Canon XF Codec camcorders MXF Converter for Mac, this is a professional and versatile tool for converting Canon XF305/XF300 MXF files to ProRes 422, including ProRes 422(HQ), ProRes 422 with high quality and ProRes 422(LT) and ProRes 422(Proxy) with a smaller size for Final Cut Pro. After the MXF to FCP conversion on Mac OS X, you can
import and edit Canon XF305/XF300 MXF in FCP X without any problem.
It is not only good at transcoding MXF recordings to ProRes for FCP X with the easiest performance, but also developed with some useful editing features, including merging mxf cilps into one for easy copy, splitting long clip for uploading to website, adding text/image/video to the imported file, replacing original audio tracks, etc.
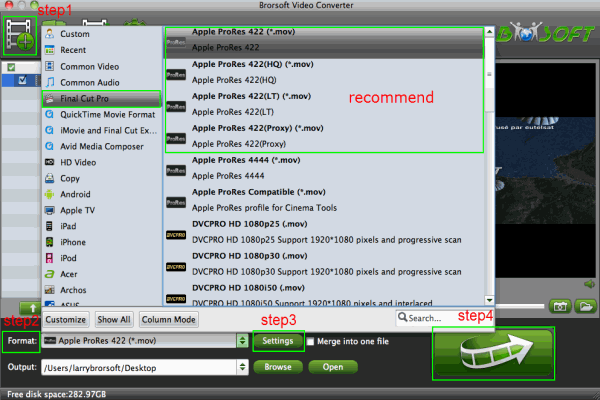
The following is a simple four-step conversion guide for transcoding Canon XF 305/XF 300 MXF to Final Cut Pro X.
Step 1: Free download the top MXF to ProRes Converter and load MXF recordings from Canon XF305/XF300 on Mac. You can double click the imported files to get a preview.
Step 2: Choose FCP compatible video format as output. The specially designed
Apple ProRes 422 (.*mov) with five options in Final Cut Pro on the submenu, which you can get by clicking the Format box, is what you need.
Step 3: Customize video/audio parameters by clicking the Settings button on the main interface, if you have personalized needs. The bit rate, frame rate, sample rate and audio channel can be adjusted to optimize the output file quality in the Profile Settings.
Step 4: Click the button for conversion and start to
trasncode MXF footages for FCP X on Mac.
Top Tips and tricks for using Brorsoft MXF Converter applied:
1. If you want to combine several clips into one, please tick the box "Merge into one";
2. Set 1440*1080 and 1280*720 as video size in Profile settins can give you the HD converted videos with a relatively smaller size.
3. Split on the mian interface can give you the file with certain time length or file size.
4. Make sure that you have installed the ProRes codec mannually, or the converted files can not be recognized, either.
Useful Guide:
Put Canon XF105/XF300/XF305 MXF in FCP 7
Import Canon XF105 1080i MXF Footages to FCP without XF Utilities
Deinterlace and Convert Canon C300 1080i MXF files to ProRes for FCP 7
Import Canon XF100 MXF files to FCP X on Mac OS X
Transcode MXF files to QuickTime MOV for playback on Mac
Import Canon/Nikon DSLRs H.264 videos to Final Cut Pro X