Thursday, June 27, 2013

RX100 Video Question- How to import Sony RX100 MTS to Premiere, Pinnacle


Summary: Have got a Sony Cybershot DSC-RX100 and want to import/edit AVCHD .mts footages in Adobe Premiere Pro, Pinnacle Studio without rendering; check out the guide to learn how to convert Sony RX100 AVCHD MTS to Premiere Pro, Pinnacle compatible video format.

Sony Cybershot DSC-RX100 is wonderful to be taken to record full HD videos(AVCHD) when you’re travelling. Whereas, when you wanna edit those AVCHD MTS footage in Adobe Premiere or Pinnacle Studio on your PC before sharing with friends, problems may occur: the Premiere handled with the 1080p files so slowly, and couldn't edit the MTS videos smoothly. When tried the Sony RX100 AVHD footage in Pinnacle Studio, the files still can’t be handled perfectly. Well, we’ve out the solution to fix the AVCHD (.mts/.m2ts) footage in Adobe Premiere, Pinnacle Studio incompatibility issues. Go through the article to check out the solution.

So how to import/load video clips from Sony RX100 into Adobe Premiere, Pinnacle for editing smoothly? The reason you can't edit Sony AVCHD MTS files in Premiere or Pinnacle smoothly is due to the format and codec. AVCHD MTS is a delivery codec rather than editing codec. The best method to solve those problems is to transcode Sony AVCHD .mts to Pinnacle and Adobe Premiere most compatible format, for instance, the WMV with Brorsoft MTS/M2TS Converter.

Overall, the Sony Video Converter comes with supports for a wide range of video editing software and media devices, including Adobe Premiere, Sony Vegas, Cyberlink PowerDirector, Avid, Magix Movie Edit Pro, and Windows Movie Maker. It helps you convert Sony as well as Panasonic, Canon AVCHD recording to any editable format like WMV, MPEG-2, AVI HD, Avid DNxHD as you need without any quality loss. If you're using a Mac, please turn to its equivalent Mac version – MTS/M2TS Converter Mac, which can help you solve the AVCHD and Mac incompatibility.

How to Convert Sony RX100 AVCHD footages into Adobe Premiere/Pinnacle for editing smoothly


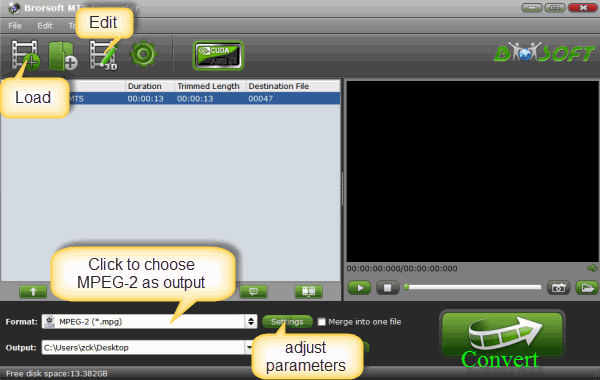
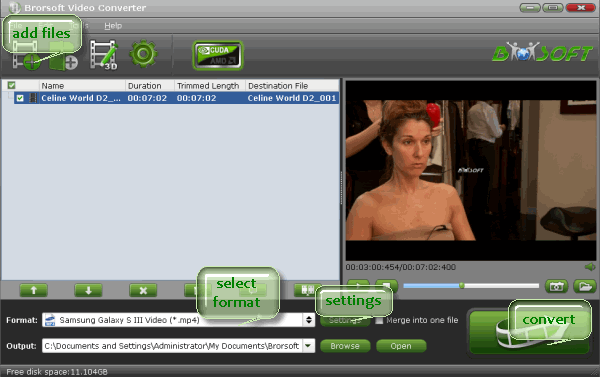
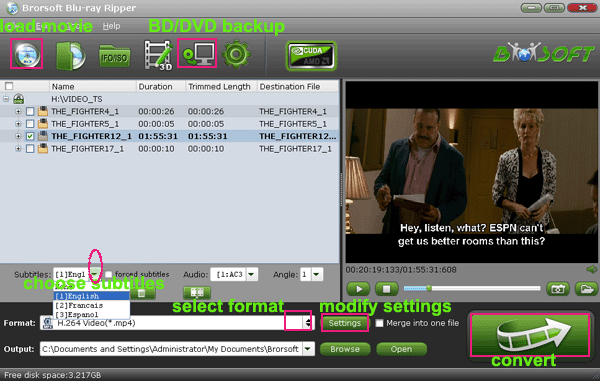
Step 1. Free download and run the MTS Converter and import Sony AVCHD mts files to the program.

Tip: You can merge the MTS clips with this MTS joiner by checking the “Merge into one” box.

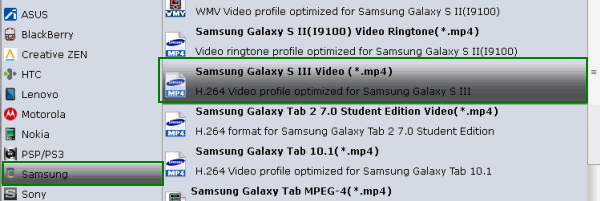
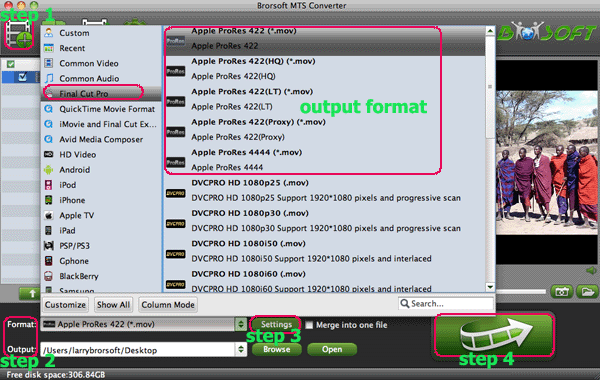
Step 2. Hit the Format box and select proper format.

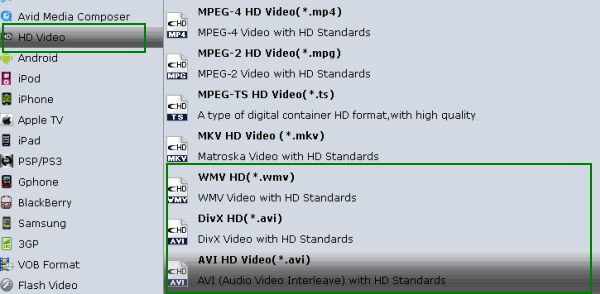
a. For Adobe Premiere Pro, “Adobe Premiere/Sony Vegas > MPEG-2 (*.mpg)” is the best output format. “WMV (VC-1) (*.wmv)” is also the proper one.


b. For Pinnacle Studio, choose “HD Video -> AVI HD Video (*.avi)” as output, which seems to be the best one due to the great video quality but small size. Of course, MPG, MP4, WMV are also the proper formats for Pinnacle.


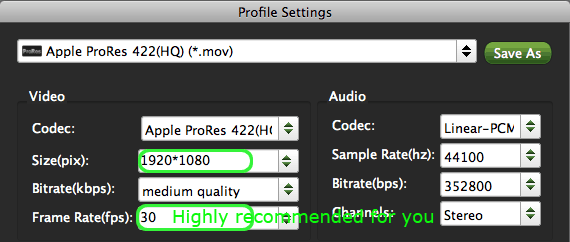
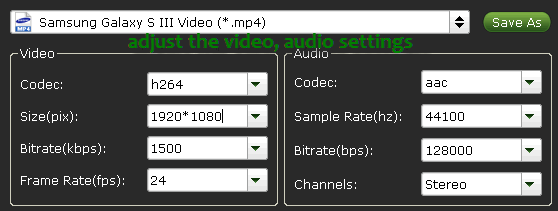
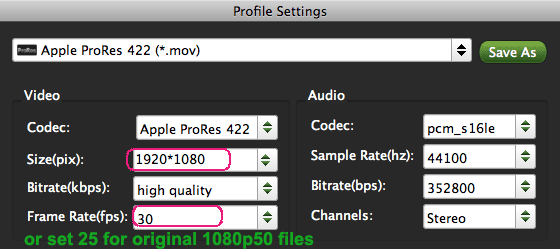
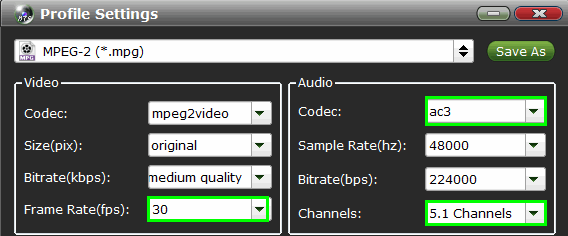
Step 3. Click "Settings" button if you’d like to customize advanced audio and video parameters like Video Codec, aspect ratio, bit rate, frame rate, Audio codec, sample rate, audio channels.


Step 4. Click the convert button; it will start transcoding MTS for importing to Pinnacle Studio, Premiere Pro immediately. Soon after the conversion, just click “Open” button to get the generated files for edit in Pinnacle Studio, Premiere perfectly.

More topics:

Sony DSC-HX30V AVCHD Files to FCP 7

Convert Sony Cyber-shot DSC-TX10 AVCHD to FCP X

Convert 1080/50p AVCHD to MPEG-2 for Premiere Elements

Transcode 1080p AVCHD to MPEG-2/WMV for Premiere Pro

Convert Sony Cyber-shot DSC-HX100V AVCHD to iMovie

How to solve issues Sony XDCAM EX files not working FCP

Load DSC-TX55/TX66/TX10 AVCHD footage to Premiere Pro

Editing AVCHD .mts/m2ts files in Pinnacle Studio Smoothly

Windows Movie Maker: How to Import & Edit MTS files

Get AVCHD footage from Sony FS700 into Avid Media Composer on Mac

Transcoding and Deinterlacing Sony DSC-WX80 to FCP 6/7

Monday, June 17, 2013

AVI and FCP X-Converting AVI files to Apple ProRes for editing in Final Cut Pro X smoothly


Summary: To get Final Cut Pro X work with AVI files beautifully, the easy workaround is to transcode AVI to Apple ProRes, which easures the best results when using in FCP X. Here is how-to.


We usually saw Final Cut users encounter importing issues when attempting to edit AVI files with Final Cut Pro X. Let's see some frequently asked questions on this.

Q1: FCP X can't import AVI's???

I had been messing around with some AVI files I had from around 8 years ago and noticed I cannot import them into FCPX - but they import just fine into iMovie. Seems kind of strange that the entry level program can do something that the higher end program can't.

Q2: Final Cut Pro X AVI Problems.

When I import avi video into Final Cut, the preview screen won't work whatsoever, it just stays black, even when the video is fully imported. As soon as I try to play it, Final Cut Pro freezes and I have to force quit it. The rest of the program seems to work fine.

Firstly, does anyone know why it might be doing this and what I can try to solve it?

Secondly, if I can't solve it, can anyone recommend an alternative program I can use?

Wanna to import AVI files to Final Cut Pro X for editing but FCP X doesn't let you do it? Final Cut Pro is famous for its powerful editing features. Unfortunately, AVI is not supported by FCP X. To get AVI files and Final Cut Pro X to play nicely, the easy workaround is to transcode AVI to Apple ProRes, which ensures maximum editing quality and efficiency when working with Final Cut Pro X. Along with some help from professional AVI to ProRes Converter, it can be done. To help those who wanna edit .avi files in Final Cut Pro X, here I share with you a simple guide on how to convert AVI to Apple ProRes MOV format for FCP X.

First of all, download the app - Brorsoft Video Converter for Mac

Overall, the program is a professional yet all-in-one video conversion tool. With it, you can easily rewrap all AVI files to ProRes 422, ProRes 422 HQ or 4444 for using in Final Cut Pro X/7/6. It also provides simple video editing functions for you. Besides, the Mac video converter can convert HD videos from HD camcorders or DVs (like JVC, Panasonic, Sony and Cannon) for editing in Final Cut Pro, Final Cut Pro X, Final Cut Express, iMovie, Avid MC, Adobe Premiere Pro etc. Just download it and follow the tutorial below to get the work done.

Guide: Transcoding AVI to Apple ProRes for Final Cut Pro X

Step 1: Launch the Mac ProRes Conversion program; click "Add" button from main menu to browse your computer hard drive and select the AVI files you want to convert. Or you can easily drag-and-drop files into this application for converting. You can also load video files formatted in .mkv, .wmv, .flv, .vob, etc.


Tip: You can check the “Merge into one” box to merge several avi video files together for easier editing.

Step 2: Click the format bar, and move mouse cursor to "Final Cut Pro > Apple ProRes 422 (*.mov)" as output format.


Step 3: Click "Convert" button to start encoding AVI files to Apple ProRes MOV for Final Cut Pro X under Mac OS Mountain Lion.

Some more helpful features of the AVI to FCP Converter for Mac

1. Settings- click to set video resolution(1920×1080/1440×1080/1280×720/720×480), bitrate(from 1Mbps to 20Mbps), frame rate (24p/30p)


2. Editor (next to "Add" icon)- click to set deinterlace, denoise, mute, volume up, trim, crop, etc.

Once the AVI to ProRes 422 conversion is done, you can transfer your AVI files into Final Cut Pro X for editing smoothly on Mac with ease.

Additional Tips
1. If you meet any importing & editing problems with kinds of popular video edit programs like FCP, FCE, iMovie, Adobe Premiere Pro, Avid Media Composer, etc, you can link to Video Editors Tips and Tricks colum to get the solution.

2. If you are a Panasonic, Canon or Sony user, you can get the Full HD video camera tips to fast solve the MOV, AVCHD .mts/m2ts, MXF importing and editing issues.

Related Guides

Edit AVCHD MTS, M2T, M2TS files in Final Cut Pro

Tip for Importing MTS files to Windows Movie Maker

Using GoPro HD videos in Windows Movie Maker

Can't import AVI files into Premiere Pro CS5/CS6?

How to: Convert MKV to Final Cut Pro for editing and sharing

How to Convert MKV files to editi with FCP 6/7/X for sharing

Thursday, June 13, 2013

Galaxy S4 AVI file player-Converting/Compress AVI files to fit your Galaxy S4


Summary: Having problems when playing AVI files on Samsung Galaxy S4? The article explains why and how to get all AVI videos and Galaxy S4 to play nicely.


The Galaxy S 4's 5-inch 1080p HD screen definitely bring you an extraordinary movie watching experience. The jelly bean handset supports WMV9, WMV7, WMV8, H.264, MPEG4, Xvid, DivX, H.263, and VP8 video codecs. Most of the time you can enjoy AVI videos on the Galaxy S4 smoothly, but you may also encounter troubles when playing AVI files on Galaxy S4. That is because AVI is a container format. It can be encoded by different codecs, some of the codecs may not compatible with Galaxy S4, so you’ll have problems when playing these AVI videos on your Galaxy S4, even with some popular Android video player like MX player, Mobo, etc. If you’re confused about this and have no idea, here you will find the best solution.

To watch those uncompatible AVI files on Samsung Galaxy S4 successfully, the best solution is to encode/re-encode AVI to Galaxy S4 supported video formats. Here is how:

In the first place, free download Brorsoft Video Converter app. Overall, the program can be used as an all-in-one video conversion app for for Galaxy phones and tablets. With it, you can easily transcode AVI to MP4 videos for Galaxy S4 with high quality and fast encoding speed. Besides AVI, it can also help you transfer almost all 1080p/720p HD videos including MKV, VOB, MPG, MOV, TiVo, MTS etc. for Galaxy S4, Galaxy Tab 2 10.1/7.0, Galaxy Note 2, Galaxy S3 and other Android os tablets. It has an equivalent Mac version entitled Brorsoft Video Converter Mac, which can convert .avi videos to Galaxy S4 on Mac OS X (Include Lion and Mountain Lion).

How to Convert AVI videos to Samsung Galaxy S4 supported video formats

Step 1: Add AVI Video Files

Install and run the Galaxy S4 Video Converter to your PC, clic “Add Video” or “Add from folder” to import your source AVI videos. Batch conversion is supported so that you can add multiple files.


Step 2: Select output format for Samsung Galaxy S4

Choose output profile for Galaxy S4. Here I recommend you "Samsung > Samsung Galaxy S III Video (*.mp4)" which is a format specially designed for Galaxy S3 but also works for the S4.


Tip:
If you like, you can click on Settings you could easily set bitrate, frame rate, codec, channels, sample rate, etc to adjust parameters that affect video quality and file size for the video you prefer. Keep in mind that bit rate higher results in big file size, and lower visible quality loss, and vice versa.


Step 3. Start converting AVI to MP4 for Galaxy S4

In the end, go back to the main interface and click the “Convert” button to start converting AVI video files for playing on Galaxy S4. Once the process completes, just click “Open” to find the Galaxy S4 playable MP4 videos after the conversion and transfer them to your device with ease.

If you have no idea about Samsung Galaxy S4 file transfer, refer to the guide "How to transfer media files to Samsung Galaxy S4" to learn more.

Additional Tips:

If you are considering to get a powerful all-in-one tool to convert videos, Blu-ray movies and DVDs to your Samsung Galaxy S4 or other devices like iPad, Google Nexus 10/7, Kindle Fire HD, Samsung Galaxy Note 2, Galaxy S3, Galaxy Tab 2 10.1 at the same saving time and effort, the all-in-one Blu-ray Video Converter Ultimate program will a nice choice for you. If you are running a Mac OS X computer, iMedia Converter Mac is the alternative.

See Also:

How to Convert DVD to MP4 videos for Samsung Galaxy S4
How to Rip Blu-ray for playback with Samsung Galaxy S4
How to Play MKV, AVI files on Samsung Galaxy S4
Enable Galaxy S4 to play MPG/MPEG videos
Convert and transfer Blu-ray movies to Galaxy S4 with best quality
Transfer movie Blu-ray to Asus Transformer Pad Infinity TF700
Convert YouTube Movies into a format that can be played on Surface RT/Pro
Enable Galaxy Tab 3 to play AVI files smoothly

Purchase Blu-ray Ripper for Asus Infinity TF700 - Transfer movie Blu-ray to Asus Transformer Pad Infinity TF700


Summary: The article guides you how to rip and convert Blu-ray movies to Asus Transformer Infinity TF700 supported video formats on Mac and Windows so that you can view Blu ray movies with Asus Infinity TF700 anywhere.


Asus Transformer Pad Infinity TF700, as one of the best Android tablets, comes with a 10-inch display and its IPS screen sports a 1,920x1,200-pixel resolution, which is wonderful for movie or TV shows enjoyment. If you’re wondering how people are converting their Blu-ray's to a video file compatible with the Infinity, read on and you can find a simple way to achieve your goal.

For getting Blu ray movies onto Asus Infinity TF700, a Blu-ray encoding software is necessary. I’ve tried at least there applications but the picture quality was not very good at all, it would pixelate in high motion scenes that is just very annoying to me. I tried the built in profile and even built a couple from scratch and they all came out the same. Well, when I tired Brorsoft Blu-ray Ripper, it works perfectly with the excellent picture/image quality.

The program can be used as a great Blu-ray Converter for Asus Infinity TF700, Transformer Prime TF201, Transformer TF101, Transformer Pad TF300, Nexus 7, Nexus 10, Kindle Fire HD, etc. In fact, it’s a yet professional Blu-ray to Android ripping tool; in other word, it enables you to play Blu-ray on all Android based Tablets. The output quality is excellent and the encoding speed is very fast. If you are a Mac user, please get the Mac Blu-ray ripper for ripping Blu-ray to Transformer Infinity on Mac OS X(Mountain Lion included). Now download and follow the below step-by-step guide for you.

Guide: Converting Blu-ray for playback with Asus Infinity TF700

Note that the guide below uses Blu-ray Ripper for Windows screenshots. The way to finish your task on Mac is almost the same. Just make sure you've downloaded the right version.

Step 1. Launch the Blu-ray to Asus Infinity TF700 Converter, insert the Blu-ray disc to your computer drive, and then load your blu-ray movies to this program. You can also add ISO file, IFO file or Blu-ray/DVD folder.


Step 2. Now select the output format for playback on Asus TF700, You can get optimized videos for Transformer Pad Infinity TF700 under Android > Asus Transformer Pad Infinity 700 Full HD Video (*.mp4).


Tips:

1. Select the main movie, and set desired language from drop-down list of “Subtitles” box.


2. If you like, you can click "Settings" to change the video encoder, resolution, frame rate, etc. as you wish. For watching videos on the Asus Transformer tablets, 720p with 1500~2500kbps is just all right. I found the file size and video quality is based more on bitrate than resolution which means bitrate higher results in big file size, and lower visible quality loss, and vice versa.


Step 3. Finally, click "Convert" button to start ripping Blu-ray files to .mp4, the Asus Infinity TF700 best video format.

Once the conversion completes, you can transfer the result videos to your Asus Tablet. In this way, you can play Blu-ray movies on Asus Transformer Pad Infinity TF700 and enjoy them on the go.

Additional Tips:

If you are looking for a powerful all-in-one tool to convert videos, Blu-ray movies and DVDs to your Google Nexus 4, Google Nexus 10/7, Kindle Fire HD, Samsung Galaxy Note 2, Galaxy S3/S4, Galaxy Tab 2 10.1, Nook HD, Transformer Prime, etc at the same saving time and effort, the all-in-one Blu-ray Video Converter Ultimate program will be a nice choice for you. If you are running a Mac OS X computer, iMedia Converter Mac is the alternative.

See also:

Play MKV to Asus Eee Pad Transformer Prime
Play DVD on Asus Eee Pad Transformer Prime
Transfer 1080p HD video to Asus Eee Pad Transformer Prime
Convert MKV to Asus Transformer Pad 300 with full screen playback
Rip Blu-ray to Asus Transformer Pad TF300T with forced subtitles
Play All AVI files on Asus Transformer Prime/Infinity TF700
Convert MKV files so that we will work on a Nokia Lumia 520
Ripping DVD movies to Sony Xperia Tablet Z

Monday, June 3, 2013

Final Cut Pro: Importing/Editing AVCHD footage in MTS, M2T, M2TS file format smoothly


Summary: Facing issues when importing and editing AVCHD MTS, M2T, M2TS files Final Cut Pro HD/6.0/7/X? Get the best Mac MTS to ProRes Converter to achieve your goal smoothly.

AVCHD (Advanced Video Coding High Definition), often with the file extension of mts, m2ts or mt2, is a professional digital recording format for Sony, Panasonic, Canon and more camcorders and cameras. Though Final Cut Pro HD/6.0/7/X announced to support AVCHD video files, some AVCHD files still can not imported to Final Cut Pro HD/6.0/7/X: AVCHD support is available only on Intel-based Macintosh computers; FCP only supports AVCHD camcorders typically connect to computers via USB 2.0, not FireWire; DVD-based AVCHD camcorders are not currently supported by Final Cut Pro HD/6.0/7/X; Standard definition video recorded with AVCHD camcorders cannot be accessed in Final Cut Pro HD/6.0/7/X.

In order to import all kinds of AVCHD to Final Cut Pro HD/6.0/7/X successfully, it is better to convert AVCHD in MTS, M2T, M2TS to Apple ProRes 422 which works well with Final Cut Pro HD/6.0/7/X.

The following guide just aims to provide your a step by step guide on how to convert AVCHD in MTS, M2T, M2TS to ProRes with almost no loss of video and audio quality.

Transcoding AVCHD in MTS, M2T, M2TS to ProRes MOV for Final Cut Pro

The quick workaround is to use the easy-to-use yet professional app called Brorosft MTS/M2TS Converter for Mac which is compatible with OS X Leopard (10.5), Snow Leopard (10.6), Lion (10.7), Mountain Lion (10.8). It is free, clean and safe to install and use. With it, you can effortlessly transcode AVCHD MTS, M2TS, M2T to ProRes MOV for Final Cut Pro HD/6/7/X, and it works well and converts flawlessly. Below is how.

Step 1: Load AVCHD footage to the Mac ProRes Converter[b]

Use a card reader to copy and transfer the .mts, m2ts files to iMac hard drive disk, run Mac MTS Converter as the fast Mac MTS to ProRes Converter, and click the “Add” button to load the .mts videos. You can also use the drag-and-drop method to load the 1080p .mts files to the application UI.


[b]Step 2. Choose outout format


Press “Format” option and navigate the mouse cursor to choose “Format > Final Cut Pro > Apple ProRes 422 (*.mov)” as the best codec for FCP 6/7 and FCP X on Mac.

Step 3. You can click “settings” button in the main interface to customize the output video’s parameters, such as resolution, frame rate, etc.


Step 4. You can edit the MTS video before you convert AVCHD MTS/M2TS/M2T to ProRes MOV.

By clicking “Edit” button, you can trim, crop the video, or add watermark and adjust effect to the videos which you will convert.


Trim – Choose to reserve the part you need. Just choose the chapter which you need to trim, to set “start time” or “end time”, type the portion which you want to save.

Crop – Remove black edges of your video or just get the scale of this video you want.

Effect – Adjust the effects by adjusting the parameters, such as:

1) Deinterlacing – If there are some stripes on the picture, you can check this option to make a better picture effect. (Checked by default)

2) If you want to get 3D effect, just enable this fuction and do settings:

Step 5. Start the conversion

Click the “Convert” icon under the preview window, and the Mac MTS to ProRes Converter will start transcode AVCHD in MTS, M2T, M2TS to Prores MOV for FCP on Mac.

After the conversion, click the “Open” button to locate converted files, then load ProRes .MOV files in FCP (X). Now you can successfully and easily import AVCHD footage to Final Cut Pro HD/6.0/7/X for editing with best quality.

Additional Tips:

1. If you are also a FCP X user, before you try to do the conversion, don’t forget to make sure that you have installed the Apple ProRes Codec manually since the FCP X asks users to install it by themselves.

2. If you want to edit AVCHD MTS in iMovie, you just need to choose the “iMovie and Final Cut Express -> Apple InterMediate Codec (AIC) (*.mov)” in the second step.

3. If you want to batch conversion, the professional iMedia Converter for Mac is the best choice for you.

Related Topics:

Import Panasonic AG-HPX3100 P2 MXF to Final Cut Pro

Convert Canon 700D (Rebel T5i) MOV to ProRes for FCP X/7/6

Handling Cyber-shot DSC-WX80 1080 60i MTS clips with FCP 6/7

Converting Panasonic P2 Card MXF to Apple ProRes for Final Cut Pro 7/X

Solving Sony Cyber-Shot WX80 and Final Cut Pro Importing Issues

Transcode MP4 files from Sony PMW-350 to Adobe Premiere Pro CS4/CS5