Tuesday, July 30, 2013

Convert Canon C100 MTS clips to Sony Vegas Pro MPEG-2 video

Summary: Want to find the best way to transcode Canon C100 AVCHD video for importing and editing with Sony Vegas Pro? Read this article below and you will know how to make it.


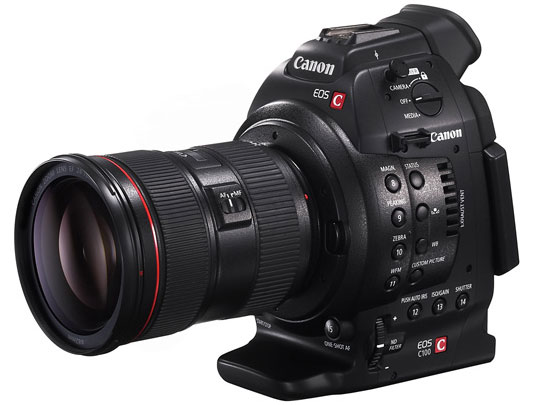
The EOS C100 Digital Cinema Camera is an ultra-compact, highly versatile camera that will appeal to a wide spectrum of independent videographers including corporate video makers, wedding and event video producers, small video production companies, film schools, and more. However, you may face a problem when trying to import Canon EOS C100 AVCHD to Sony Vegas Pro.

As you know, Canon C100 offers 1,920 x 1,080 AVCHD; while, due to video format compatibility problem, it is may be impossible for you to import AVCHD MTS files to Sony Vegas directly who natively work with WMV or MPG files perfectly. The fastest and safest way to solve this problem is to find a useful Canon C100 MTS Converter to transcode these files to Sony Vegas Pro fully compatible format. Here is the solution for you:

First of all, download and install Brorsoft MTS/M2TS Converter

This MTS to Sony Vegas Converter is specially designed to help people edit MTS files in Sony Vegas (all versions included) by simply converting AVCHD MTS files from Sony, Canon, Panasonic camcorders to Sony Vegas readable WMV or MPG files without any quality loss.

Tips:

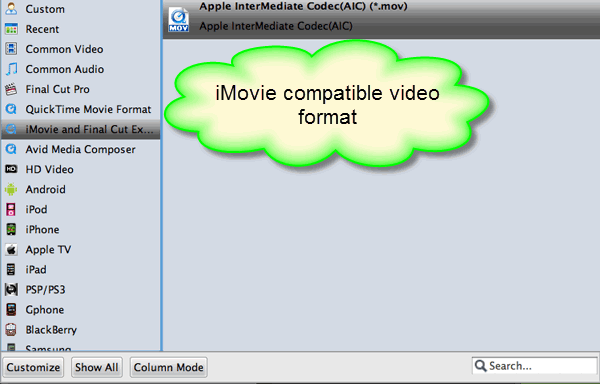
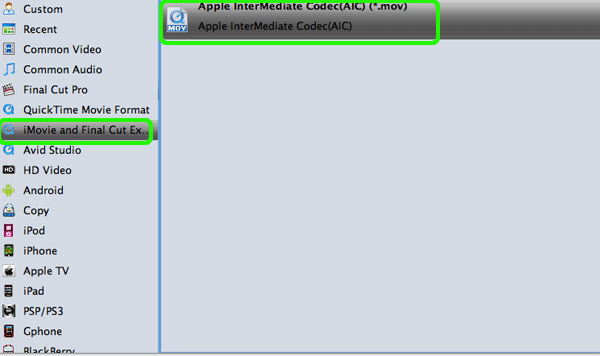
So if you are still complaining that when importing Canon C100 MTS files to FCP X, iMovie, Avid Media Composer, Adobe Premiere Pro, you often come across the problem that can not edit them with ease. No worries! This convert app can also help you.

Step by step to convert Canon C100 MTS files to Sony Vegas

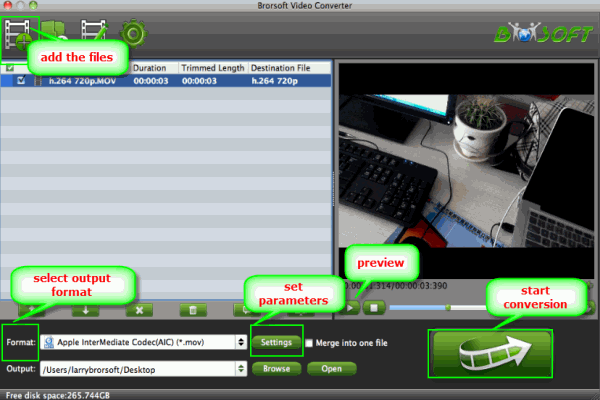
Step 1: Launch the Canon MTS Converter and click "Add " button to import as many MTS videos as you like into AVCHD Video Converter.


Step 2: Get the dropdown menu of “Format” and then move your pointer to “Adobe Premiere/Sony Vegas”. Choose MPEG-2 as the output format from the profile list which is the Sony Vegas Pro compatible video format. Besides, WMV (VC-1) (*.wmv) and MOV (AVC)(*.mov) are also options for you.

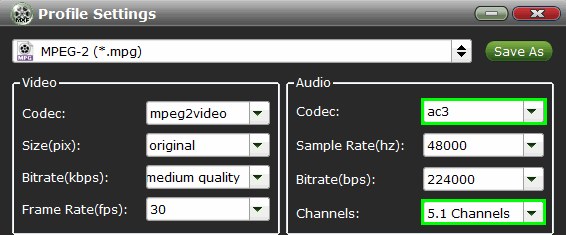
step 3: Adjust video and audio parameters, including the Bitrate of Video and Audio, the Codec of Video and Audio, Video Size, Sample Rate, Frame Rate, Audio Channels, etc., in the Profile Settings to get Canon C100 files converted with original quality.


Step 4: Click "Convert" button to convert Canon MTS to MOV, WMV or MPG for easy MTS editing in Sony Vegas.

Tips:

If you need to convert AVCHD, MTS, M2TS videos on Mac OS X(Mountain Lion included), you can try AVCHD Converter for Mac.

See more:

Editing Canon C300 MXF in Avid Media Composer
Import Canon EOS C300 1080i MXF to Sony Vegas Pro
Canon Vixia HF G10 and iMovie Importing Workflow
Put Canon EOS C100 AVCHD footages in iMovie'11 without quality loss
Transcode Canon C100 4:2:0 AVCHD footage into Final Cut Pro X/7/6
Import and Edit Canon C100 AVCHD in FCP 6/7/X smoothly
Canon C100 Raw Footage work with Premiere Pro
Tricks for Editing Canon XA10 AVCHD MTS files in Vegas Pro
Nikon D800/D7100/D5200 MOV to Avid MC Editing Tricks
How to Get Panasonic AG-HPX500 P2 MXF into Final Cut Pro

Monday, July 22, 2013

AVI to Premiere Pro - How Do I import .AVI files into Premiere Pro CS5/CS6


 [Q]" The AVI files look and play great by themselves in Window Media Player, but when I import the AVI file into Adobe Premier in order to add a voice over and export the finished video into other formats, the playback is very jerky. So I can't seem to use these AVI files in Premiere as source video files and have them look good at all.

Any suggestions would be greatly appreciated.

Thanks in advance !"

[A]
Here is the step-by-step guide on transcocding AVI to MPEG-2 for Premiere Pro CS5/CS6 on Mac OS X with Brorsoft Video Converter for Mac. This video app can help you change AVI into a different format (e.g. .mov, .wmv, .mpg) with least quality loss. You should then be able to import the new file into Premiere with smooth editing without any trouble. If you are Windows users, please get the Video Converter. Below is how to.

Source: How Do I import .AVI files into Premiere Pro CS5/CS6

Step 1: Run AVI to Premiere Converter for Mac and you can import AVI clips to the program through "Add Video" button or "Add from folder" button. If you like, check the “Merge into one” box to join AVI clips together.


Step 2: Choose output format. This video converter offers optimized format preset for Adobe Premiere. Just click "Format" menu firstly and then follow "Adobe Premiere/Sony Vegas" to set MPG, MOV or WMV format.


Tip: If the default settings do not fit you requirement, you can click “Settings” icon to and enter "Profile Settings" panel to adjust video size, bit rate, frame rate, sample rate and audio channels.

Step 3: Click “Convert” button to start encoding AVI to MPEG-2(.mpg) for Adobe Premiere Pro CS5/CS6 on Mac OS X.

When the AVI to Adobe Premiere Pro conversion task is finished, click "Open" button to get the exported files for transferring to Premiere Pro CS5/CS6 with easy playback or editing.

Additional Tips:

1. This AVI to Premiere Pro Converter not only can help you convert .avi to Adobe, but also enables anyone with AVI files to use in any non-linear editor like Final Cut Pro, iMovie, FCE, Avid Media Composer, etc as long as transcode AVI to a recognizable format.

2. If you have problems when importing or editing your Canon, Sony, Panasonic etc, camera video files, you can check out “Brorsoft Camcorder/Camera Importing Tips” or “FCE, FCP, iMovie Column” to get your solutions.

See also:

Transcode AVI files to Avid Media Composer
How to Edit MP4 videos in Premiere Pro
Converting MP4 files to ProRes for Final Cut Pro
How to upload GoPro videos to YouTube
Upload GoPro MP4 files to After Effects
How to convert Canon XA10 video for Avid MC/Adobe Premiere Pro
Canon XA20 Workflow - FCP, Premiere, Avid, iMovie
How to Import & Edit Sony NEX-VG10 footage in Premiere Pro CS5/CS6
How to transfer avi files to Final Cut Pro for Editing
How Do I Upload Video clips from DVD to Youtube for sharing
Trouble Ripping DVD movies with Subtitles

Tuesday, July 9, 2013

How to get iMovie working with GoPro HD fotoage (.MP4 files) beautifully?

Summary: Facing issues when importing and editing GoPro MP4 files in iMovie '11/08/09? If so, follow the quick-start guide to learn how to prepare GoPro videos for editing in iMovie without quality loss.

Summary: The article shows you the best workaround for editing GoPro videos in iMovie by transcoding GoPro MP4 to iMovie native editing format - Apple Intermediate Codec.


GoPro video cameras like Surf Hero, Hero 960, HD Hero 2, HD Hero 3, etc are familiar with everyone whoever has passion for outdoor activities. The piont here, you will find it a pianful experience to import and edit GoPro HD fotoage with iMovie software. There’re some frequently asked questions quoted as below.

Q1: iMovie Won't Import MP4 Files from my Gopro
For some reason iMovie '11 won't let me import videos. Specifically, I'm trying to add MP4 files that I copied to my hard drive from my GoPro HD 960. For GoPro users, I used the R2 (720p) format. They open properly in QuickTime and VLC but can't be imported into iMovie (or iPhoto). When I select File-->Import-->Movies and browse to the directory where I saved all the .mp4 files on my hard drive, they're all greyed out. Any ideas? This is incredibly frustrating!'

Q2: GoPro video importing as poor quality into iMovie. HELP!
I used a GoPro Hero 3 to film a vacation and I am importing clips into iMovie to create a "music video," but the video is importing at a very poor quality. The video plays fine outside of iMovie. How do I fix this?

As you know, the GoPro cameras record in MPEG-4 and outputs its files as .MP4 files (the container). Files are compressed using the h.264 codec (as opposed to AAC or Xvid and DivX usually found in .AVI containers). So the files you are getting out of GoPro HD are suited to be delivered as is, which is usually not what you want. The GoPro HD being an “always-on” type of camera worn on your helmet, attached to your bike, surfboard or other, you usually end up with long sequences of footage you then need to edit down.

Since the MP4 codec is a final delivery codec it is not one you want to use for editing. To solve these problems, the quick workaround is to convert GoPro MP4 files to iMovie natively supported formats( Apple Intermediate Codec is highly recommended). Along with some help from third-party software, it can be done effortlessly. Here I share a simple guide on how to transcode GoPro HD MP4 files for iMovie 08/09/'11 editing smoothly. If you're facing the issues, read on to find the answer.

First of all, download the App- Brorsoft Video Converter Mac

Overall, the program is an easy-to-use yet all-in-one video conversion app which can be used as a GoPro camera video converer under OS X Leopard (10.5), Snow Leopard (10.6), Lion (10.7), Mountain Lion (10.8). It is free, clean and safe to install and use. With it, you can effortlessly transcode GoPro MP4 to Apple Intermediate Codec, which will create an iMovie friendly file format keeping the Gopro orginal quality. Besides iMovie, this software can also export DNxHD for Avid, MPEG-2 for Sony Vegas, Premiere Element, AVI for Pinnacle Studio, ProRes for FCP, more NLE systems for native editing. Just download it and follow the tutorial below to get the work done.

Convert/Import GoPro HD MP4 files into iMovie

Step 1: Add Gopro MP4 video files

Install and launch the GoPro HD MP4 converter and load source MP4 clips to it.


Step 2: Choose output format

Hit the "Format" bar and select iMovie and Final Cut Express > Apple InterMediate Codec(*.mov) as output format on the drop-down menu.


Tip - Profile Settings:
In case the default settings do not fit your requirement, you can click “Settings" button and enter “Profile Settings" panel to adjust video size, bit rate, frame rate, sample rate and audio channels.

Step 3: Start GoPro MP4 to iMovie AIC conversion

Click “Convert" button to start encoding Gopro HD MP4 video to Apple InterMediate Codec for importing to iMovie 08/09/11. When the conversion task is finished, click “Open" button to get the exported files and then import the converted GoPro MP4 files into iMovie to do further editing without problems.

Additional Tips:
If you want to edit GoPro video in Final Cut Pro X or FCP 7/6, you just need to choose the "Final Cut Pro > Apple ProRes 422 (*.mov)" as output format in the second step; For Avid Media Composer, choose "Avid Media Composer > Avid DNxHD(*.mov)" as output; For Adobe Premiere Pro or Vegas Pro, choose Adobe Premiere/Sony Vegas> MPEG-2(*.mpg) as output.

GoPro Video Preparing Quick-Start Guides for Editing:

GoPro and Avid MC workflow | GoPro to FCP 7 Workflow | GoPro files and Premiere Pro | GoPro MP4 in Pinnacle Studio | GoPro footage editing with Windows Movie Maker

More Articles:

Canon Vixia HF R42 and Final Cut Pro Importing Workflow
Best way for Editing Canon MXF clips in Avid Media Composer
How to Get Avid MC work with GoPro camera video files
FCP set up to Import Sony PDW-F800 XDCAM footage
Transcoding Canon XF305/XF300 50Mbps MXF to Sony Vegas Pro
How to edit 4K video in Final Cut Pro 7 and FCP X smoothly
Cannot import MOV video off of Nikon 1J1/1J2/1J3 to FCP X/7

Thursday, July 4, 2013

4K Camcorder Video Converter - Transcode 4K videos for editing in Final Cut Pro X/7/6 smoothly

Summary: With the 4K Camcorder video converter, you can easily import and edit Sony, Blackmagic, GoPro, Panasonic 4K Camcorder AVCHD/MTS/M2TS/MXF videos in Final Cut Pro X or FCP 7 by transcoding to Apple ProRes format.


Are you got a 4K camcorder? When you traveling with your friend or family, I think you often take up the instantaneous which the camcorder pats to like. Before you share it with others, you may edit these HD video in FCP 7 and FCP X. FCP 7 and FCP X can’t import your camcorder video? What a pity.

What video format can import to FCP 7 and X? You can get answer from Apple’s official website. This link is about Final Cut Pro X supported video and audio format:

http://www.apple.com/finalcutpro/specs/#supported-formats-and-io

Note 1: Import, export, and edit MXF-wrapped media from archives or asset management systems via third-party plug-ins.

Note 2: Background transcode original media to ProRes 422 or ProRes Proxy for better performance.

The latest version of the FCP X support import video resolution up to 5K, why FCP 7 and FCP X can't import 4K video files? Obviously, resolution isn’t a problem, video format is a major cause. Different video format has different video and audio codec, FCP X and FCP 7 doesn’t support all formats importing. Such as FCP X and FCP 7 can’t import some 4K AVCHD/MTS/M2TS video files, FCP X and FCP 7 can’t import 4K MXF video from Sony, Blackmagic, GoPro, Panasonic and Canon etc.

So, How to edit 4K video in Final Cut Pro X and FCP 7?

Through the introduction of apple.com, we can get a best solution for 4K video, that is transcode transcode 4K video to Apple ProRes, which ensures maximum editing quality and efficiency when working with Final Cut Pro X or FCP 7. To get the work done, we need to get some help from a 4K video to ProRes Converter. Here Brorsoft Video Converter for Mac is a nice choice to achieve your goal smoothly. With it, you can effortlessly transcode Sony, Blackmagic, GoPro, Panasonic, Canon 4K video to ProRes 422 codec which ensuring the best results when using FCP X/7. This will help you import the file correctly and saving the rendering time. Below is a brief guide for you.

The 4K Video Converter supported 4K Camcorders:

Sony: FS700, CineAlta F5, CineAlta F55, CineAlta F65

Canon : EOS C500, EOS-1D C DSLR,

Astrodesign AH-4413, Point Grey Flea3 8.8 MP, GoPro HERO3 Black, Nvidia GTX Titan, AMD Radeon HD 7970

Guide: How to Convert 4K video to FCP X/7 ProRes 422

Step 1: Load 4K video to the 4K to FCP Converter

Click "Add" or "Add from folder" and import the 4K video into this software. Besides ProRes, 4K Video to Mac converter Mac can help you transcode 4K video to DNxHD, Apple Intermediate Codec, MPEG-2, WMV for Avid, iMovie, FCE, Premiere Pro for Mac importing natively.


Step 2: Choose output format

Click on "Format" bar and locate the appropriate output profile. move mouse cursor to “Final Cut Pro > Apple ProRes 422 (*.mov)” to set a FCP 7/X best codec.


Step 3: Start transcoding 4K video to ProRes 422

Click Convert button to start Sony, Blackmagic, GoPro, Panasonic and Canon 4K video to FCP 7 and FCP X ProRes 422 conversion.

After conversion, locate and select the file you want to import, then click Import for further editing in Final Cut Pro 7/X smoothly. Now, you can edit 4K video on Mac in Final Cut Pro 7 or FCP X or FCP 6 natively, smoothly without any problem. Video and audio quality and synchronization are perfectly guaranteed.

Some more helpful features of the app:

1. Settings- click to set video resolution(1920×1080/1440×1080/1280×720/720×480), bitrate(from 1Mbps to 20Mbps), frame rate (24p/30p)

2. Editor (next to “Add” icon)- click to set deinterlace, denoise, mute, volume up, trim, crop, etc.

Tips: Before you try to do the conversion, if you are also a FCP X user, please make sure that you have installed the Apple ProRes Codec manually since the FCP X asks users to install it by themselves.

More Topics:

FCP set up to Import Sony PDW-F800 XDCAM footage

Transcoding Canon XF305/XF300 50Mbps MPEG-2 4:2:2 codec MXF to Sony Vegas Pro

Sony EX3 MP4 files to ProRes 422, ProRes 422 HQ For FCP X

Help with Sony EX3 MP4 footage in iMovie

Add DVD movies (DVDs, IFO, ISO) on HUAWEI Media Pad 7”

Load HD videos(FLV/AVI/MKV/WMV/TiVo) to HUAWEI Media Pad 7"

Tuesday, July 2, 2013

How can I handle H.264 MOV files from D3200/D800/D5100 in iMovie easily?

Summary: When you try to import camera raw H.264 MOV files from Nikon D800, D3200, D5100 to iMovie, you may find the there are some importing or editing issues. Read on the article to get the solution.

Many Cameras like Nikon D5100, D3200, D4, D800 record 1080p H.264 MOV footages. The HD video recording function helps you perfectly capture every moment of tears and laughter in your life and keep the unique memory forever. Have you got one H.264 MOV Camera? If so, you must like taking and playing the HD recordings with your family and friends. However, something painful is that you can't import Nikon H.264 MOV to iMovie for editing on your Mac smoothly.

In fact, the reason behind that is Full HD "MOV" movie files created by Nikon DSLRs use the H.264 codec for the video. Generally, .mov is friendly for iMovie, but H.264 is a delivery codec rather than editing codec. If you have got MOV videos from Nikon D3200/D800/D5100 and suffered the headache from dealing with these files, the program Brorsoft Video Converter for Mac, a top Mac Nikon MOV to iMovie Converter, which will get you out of trouble effortlessly in editing Nikon MOV files in iMovie 08/09/'11. With it, you not only can easily transcode H.264 to Apple InterMediate Codec .mov for iMovie program within a few clicks, you can also encode Nikon/Canon/Panasonic/Sony/JVC camera or camcorder videos to Apple ProRes for FCP, DNxHD for Avid Media Composer, MPEG-2 for Adobe Premiere Pro, etc on Mac OS X(Lion, Mountain Lion included). I have used it to covert many H.264 MOV files on my MacBook. It works fast and keeps the original quality in 1080 30p/24p.

[How-to]: Transocde Nikon D3200/D800/D5100 H.264 MOV recordings to AIC for iMovie

Step 1: Install and run the Nikon H.264 MOV Converter on Mac, and then click "Add files" icon to import your H.264 MOV files directly from your camera or the copied folder on the desktop.


Step 2: Hit the Format box to select the specially designed video codec for editing in iMovie: iMovie/FCE --> Apple InterMediate Codec(AIC) (*.mov).


Step 3: (Optional) Adjust the video and parameters, including the Bitrate of Video and Audio, Audio, Video Size, Sample Rate, Frame Rate, Audio Channels, etc., by clicking the Settings buttion on the main interface.

Tip: The 1920*1080 as video size and 30fps for NTSC area while 25fps for PAL area as Frame Rate are the best settings for editing in iMovie.


Step 4: Click the arrow button to start transcoding Nikon H.264 MOV to AIC for iMovie as well as Final Cut Express immediately.

After the H.264 MOV to AIC conversion finished, you can easily transfer your 1080p footages from Nikon D3200/D800/D5100 to iMovie for further editing without any problem.

Related Guides:
How to transcode Nikon MOV to ProRes for FCP
How to import Nikon MOV to Premiere Pro
How to upload Nikon MOV videos to Sony Vegas
Encodeing MTS to WMV for Windows Movie Maker
Transcoding AVCHD MTS to ProRes for FCP 7
Make 1080 50p/60p MTS clips playable for iMovie
Upload Canon XF100/XF105/XF300/XF305 MXF to Sony Vegas Pro 11/12
How to convert AVCHD to MP4, MTS to MPEG-4
Converter AVCHD MTS files to Pinnacle Studio Tips