Sunday, December 24, 2017

Free Ways to Check Correct DVD Title on Windows/Mac

Most commercial DVD discs are encrypted with higher copy protection, especially Walt Disney, DreamWorks Animation etc. film studios. New encrypted DVDs are most likely to have as many as 99 titles, most of which are fake with exactly the same length. This makes it hard to play correct DVD titles on Windows PC/ Mac or do some DVD ripping work. Don't be upset, we would like share two simple and free ways to check correct DVD title on Windows PC/Mac for you.

Method 1. Check Correct DVD Title with VLC

1. Launch VLC media player and click on Media > Open Disc to play DVD disc.
vlc.png

2. Quick Access to DVD Menu and Main Content, it seems to directly go DVD menu without your clicking DVD Control and manually go DVD Title menu, making it the top choice to get right title and saves you a few clicks and some time. But just in case for other DVDs, you may have to go DVD Menu.

check-dvd-title-with-vlc.jpg

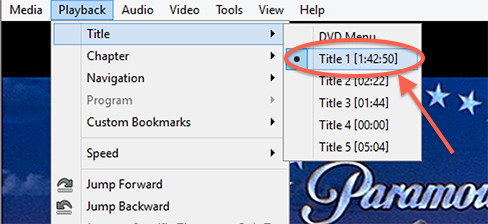
3. Last step is to check DVD Title in VLC media player, we need to go Playback->Title to check the correct title. Make sure the main movie instead of bonus or ads are playing.

Method 2. Check Correct DVD Title for Ripping via Brorsoft DVD Ripper

Another easy way recommended for you is using Brorsoft DVD Ripper (WindowsMac), which can not only check correct DVD title on Windows PC/Mac but also can remove all DVD copy protections, as well as batch convert DVD movies to common video formats including: H.264, H.265/HEVC, AVI, MP4, WMV, FLV, MPEG, MOV, MKV, etc.

Meanwhile, this easy-to-use yet professional DVD ripping tool also provides the preset formats for 150+ popular devices like: iPad, iPhone, Surface tab, Samsung Galaxy, Xbox, PlayStation, NAS, Panasonic/Samsung/Sony/LG Smart TVs. Thanks to the built-in video editor, you can personalize and retouch your videos in clicks.

dvd-ripper-for-windows-trail dvd-ripper-for-mac-trail

Step 1. Install and run the best DVD ripper, and click the "Load disc" button to load the DVD movies to the program. The software will directly check and select correct DVD main title to rip, or you can select the title by clicking the checkbox.

dvd-ripper-main-interface.jpg

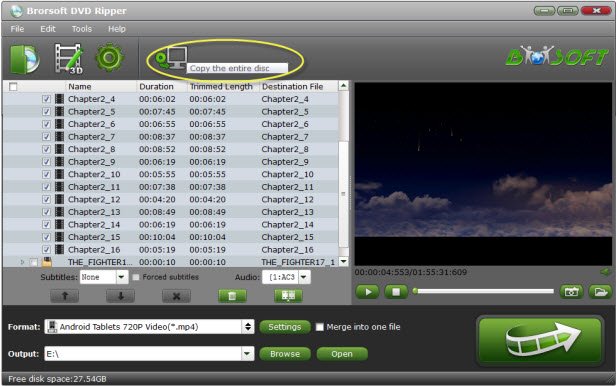
Tip: If you need to rip DVD with wanted subtitles and audio track, you can click the drop down menu after "Subtitles" and "Audio" to select your desired tracks. You can also click "Merge into One File" button to export the multiple titles into one single video.

choose-subtitles-for-note8.gif

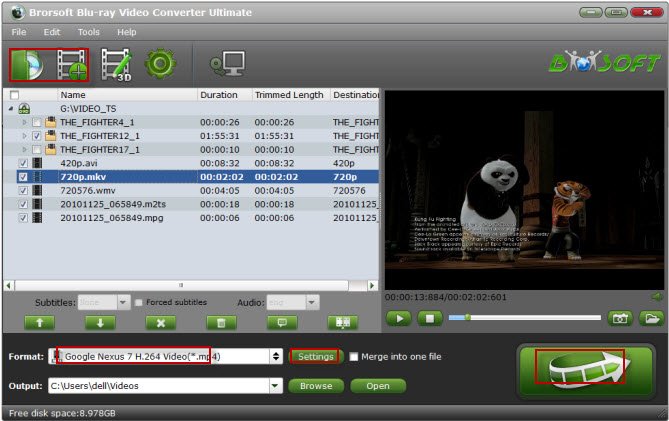
Step 2. Press on "Format" button to choose a proper output format like H.264 .mp4 from Common Video or HD Video category. You also can choose other presets according to your devices.

new-mp4-format.gif

Step 3. With the above settings, you can go back to the main interface and hit the "Convert" button to rip DVD with correct title to the desired video formats. DVD copy protection will be removed automatically. Once the conversion is complete, tap "Open" to located the ripped video files and playback as you like.

Related Articles:

MOV to Windows Movie Maker: How to Edit MOV Files in Windows Movie Maker?

Wednesday, December 6, 2017

MOV to Windows Movie Maker: How to Edit MOV Files in Windows Movie Maker?

Most users may encounter that downloaded online videos, or captured from digital camera, iPhone, iPad in .mov formats can't be loaded to Windows Movie Make. Windows Movie Maker can't even recognize your MOV files? As the free windows video editing software, Windows Movie Maker provides best support for WMV video files. To solve the MOV and Window Movie Maker editing issue, you'll need to convert MOV to WMV format.

To convert MOV files for Windows Movie Maker, Brorsoft Video Converter Ultimate is highly recommended here. It supports creating high quality WMV video for your Windows Movie Maker, no matter what's the format of your source video files. Besides, you can also convert almost any video including MOV, MKV, MP4, AVI, MTS, etc. to WMV for editing in Windows Movie Maker. Plus, with a built-in editor, you can trim, crop, effect, subtitle, watermark, etc.

Free download MOV to Windows Movie Maker video converter:
video-converter-trail

Read More: Rip Blu-ray for Plex | Play ISO Files on iPhone 8/X

Step 1. Load MOV Files

Install and launch the best MOV to WMM Video converter, simply click Load File to load your MOV files to the program.
video-converter-ultimate.jpg

Step 2. Set WMV as the output format

Click the Format and select HD Video -->WMV HD(*.wmv) on the dropdown menu as output format. Of course, WMV from Common Video is also available. If you want to make changes to the video settings like resolution, bit rate and other settings, click the Settings button at bottom.
windows-movie-maker-output-formats.gif

Step 3. Convert MOV to Windows Movie Maker compatible WMV format

When everything is ready, click the Convert button and all the imported MOV video files will be converted to WMV format by this MOV to Windows Movie Maker Video Converter.

Tips: To edit MOV video before converting, click the Edit button in the primary window. Brorsoft Video Converter Ultimate includes all regular video editing tools like Rotate, Trim, Crop, Effect, Watermark and Subtitle.

Step 4. Import MOV to Windows Movie Maker

Depending on your version of Windows Movie Maker or Windows Live Movie Maker, the buttons are slightly different:
Import MOV video to Windows Movie Maker: When the conversion complete, open Windows Movie Maker and click "Import" or "Import Video" on the left to import your video to the movie collection and drag and drop to the timeline for editing.
Import MOV video to Windows Live Movie Maker: Start Windows Live Movie Maker and go to "Home" tab in the ribbon menu and click "Add video" in the "Add" panel to locate the converted MP4 video.