Sony Cybershot DSC-TX like DSC-TX55, TX66, TX10, TX20, TX100v, DSC-TX200 are all the popular cameras among the photographers, which are wonderful to be taken to take photos and record HD videos when you travel. When you record some HD videos with the camera, you may want to edit those AVCHD MTS footages with a video editor like Final Cut Pro before sharing with others or for other uses. While, you may encounter some problems when you want to import Sony AVCHD MTS files to FCP, because AVCHD is not an ideal editable format for Final Cut, but Apple ProRes is.
Thus, to import the Sony Cybershot AVCHD MTS or M2TS files into FCP for editing smoothly, the best solution is transcoding the Sony Cybershot AVCHD footages to FCP native format- Apple ProRes encoded .mov format. To help those who wanna edit Sony Cybershot AVCHD videos in FCP 7 with no issues, here I will throw this quick guide up on how to convert Sony AVCHD MTS to ProRes for FCP 7 on Mac OS X.
If you looking for a solution for this problem likewise, check out Brorsoft MTS/M2TS Converter for Mac which is entitled as a top Sony AVCHD MTS to FCP Converter. The Mac AVCHD Conveter comes with supports for a wide range of video editing software and media devices, including Final Cut Pro, Adobe Premiere, Avid Media Composer, iMovie, FCE and more. It can help you transcode TX55/TX66/TX10 AVCHD to ProRes 422 without quality loss. Below is brief guide for you.
Step 1. Run your MTS convert program on your Mac. Then add MTS file or M2TS files to it.
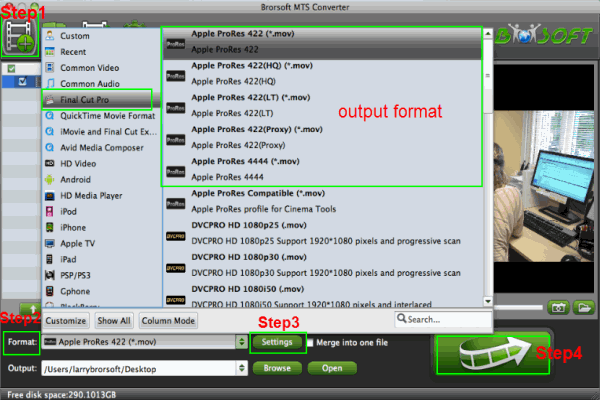
Tip: Check the box of "Merge into one file", you can join/combine several MTS files.
Step 2. Click “format” and move your pointer to Final Cut Pro category. The “Apple ProRes 422(*.mov) ” is the best output format.
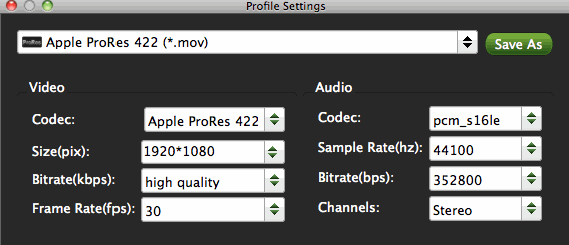
Step 3. Tap "Settings" to set video size (1920×1080/1440×1080/1280×720/720×480), bitrate (from 1Mbps to 20Mbps), frame rate (24p/25p/30p) as you need.
Trick: If your AVCHD file is 1080 50p, you need to set the frame rate as 25p while 1080 60p for 30p. Sometimes, the frame rate 29.97fps is also a good choice.
Step 4. Start converting AVCHD to ProRes under Mac OS X.
After the fast conversion, you can easily find the transcoded video by ticking "Open". Then you can import and edit Sony DSC-TX55/TX66/TX10 AVCHD mts with FCP 7 easily as you want.
See also:
Sony DSC-HX30V AVCHD Files to FCP 7
Convert Sony Cyber-shot DSC-TX10 AVCHD to FCP X
Convert Sony Cyber-shot DSC-HX100V AVCHD to iMovie
Load DSC-TX55/TX66/TX10 AVCHD footage to Premiere Pro
Import/Convert Canon EOS 650D H.264 MOV to iMovie Mac
Canon C100 and C500 digital cinema cameras join the C300
Import and Edit Canon C100 AVCHD in FCP 6/7/X smoothly
i recommend iDealshare VideoGo --a professional converter to convert any audio format or video format without any quality loss.https://www.idealshare.net/video-converter/import-mp4-to-pinnacle-studio.html
ReplyDelete