Saturday, December 19, 2015

Flash SWF in Premiere - Edit SWF movies in Premiere Pro CC/CS6/CS5/CS4 (El Capitan)

You have some SWF movies and would like to edit with Adobe Premiere Pro. But there is a disappointment that SWF format is not compatible with Premeire Pro. How to solve it ? Keep reading... 

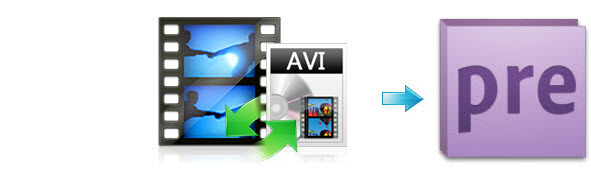
In a case like this, you need to convert SWF to Adobe Premiere fully-compatible formats. After that, you're able to edit SWF in Premiere successfully. 


For this purpose, Brorsoft Video Converter for Mac (Brorsoft Video Converter for windows) is introduced to you. It supports almost any popular audio and video ouput formats, even most devices and applications. Also, it lets you set some important video parameters like video encoder, resolution, bit rate and frame rate. With it, you can quickly convert SWF to an Adobe Premiere supported format like WMV, so you can successfully import your Flash SWF files to Adobe Premiere to edit. Just follow the step-by-step guide below. 

By the way, this SWF to Premiere converter also provides all common and handy video editing tools, say, crop, cut, rotate, add watermark, subtitle files and various cool effects etc. If need, you can directly edit your SWF files in this app. 

Tutorial on converting SWF to Premiere Pro in simple steps 

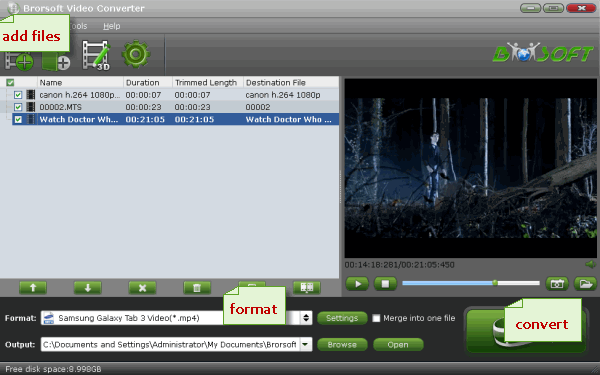
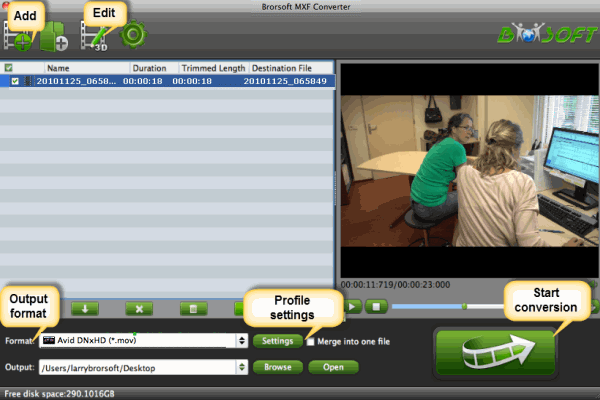
Step 1: Launch the best SWF to Premiere Pro Converter on Mac, and then click the "Add" button to import the .swf videos to the program. (Drag and Drop is also a convenient way to load the videos.) 


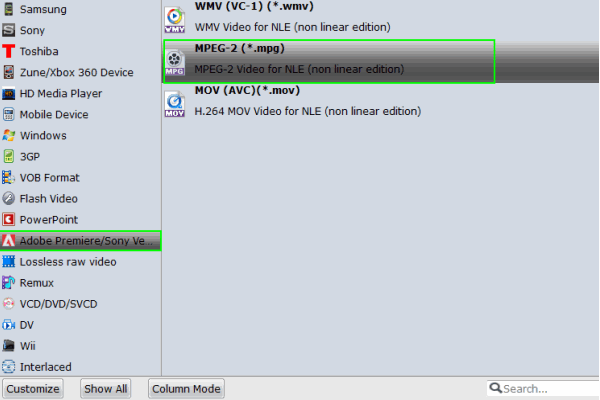
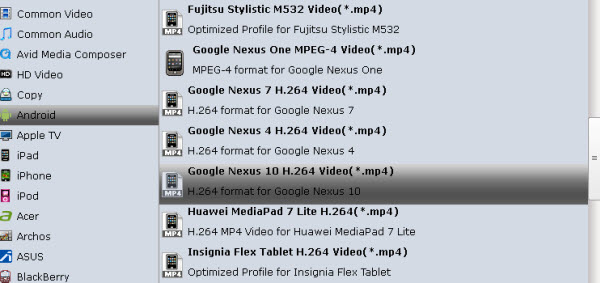
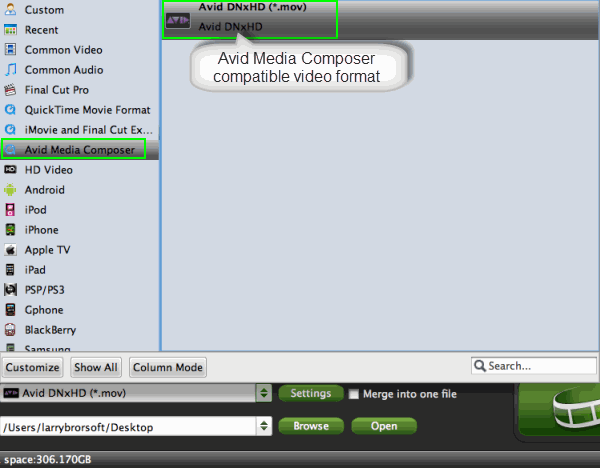
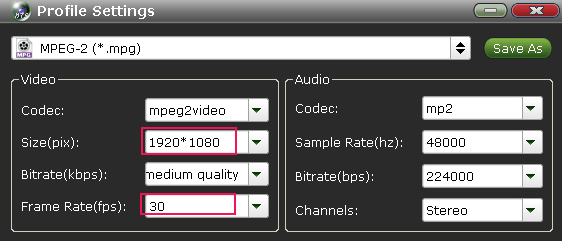
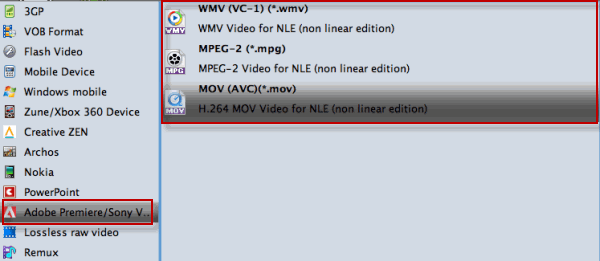
Step 2: Set the output format - Click "Format" drop-down bar to select a proper video format. To edit flash SWF videos in Adobe Premiere Pro, then Adobe Premiere/Sony Vegas > MPEG-2 (*.mpg) is the suitable one. 


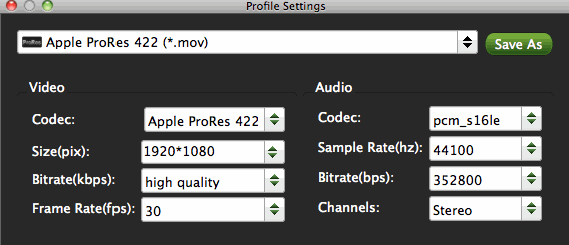
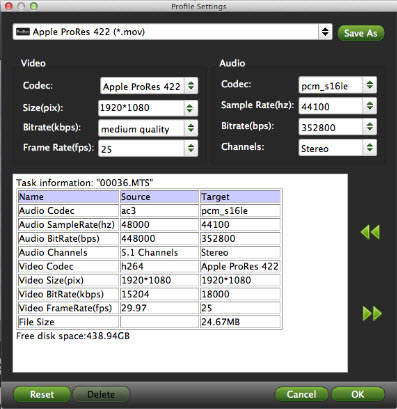
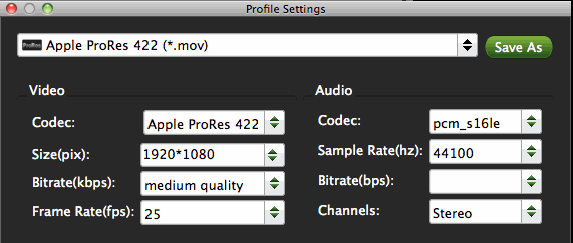
Tip: Click the "Settings" button, you are able to enter the "Profile Settings" panel to adjust video and audio parameters for SWF source files, including video size, bit rate, frame rate and more. 

Step 3: Finally, press the Convert button and the program will start to convert SWF files to MPEG-2 which is ready to be imported into Premiere Pro CC/CS6/CS5/CS4 without any problem. 

More Topics: 

How to Convert Video_TS Folder to MP4 
How to Import SWF File to Premiere Pro for Editing 
3 Ways to Recover Photos from iPhone (Mac & Wins) 
How to Solve SWF file and Premiere Elements Problems 
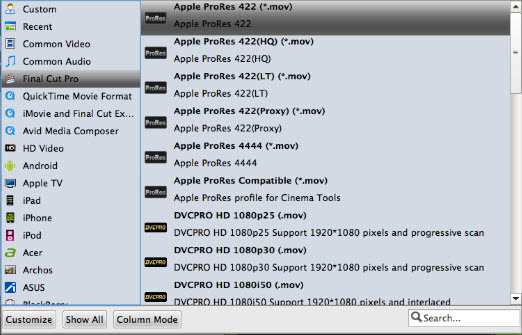
How to Convert and Import SWF into Final Cut Pro X/7/6 
Tutorial on converting Sony a68 XAVC S to Final Cut Pro 7 
Recover Deleted Reminders on iPhone (iPhone 6s Included) 
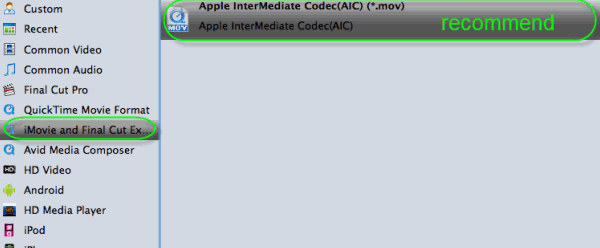
SWF to iMovie - How to Convert and Import SWF files to iMovie 
Enjoy Blu-ray/DVD ISO files to NAS MKV/MP4 for DLNA Streaming

Tuesday, December 15, 2015

Import and Edit Tivo Recordings in Premiere Elements on Mac ( El Capitan)

This article just aims to offer an easy way to edit TiVo files with Adobe Premiere Elements in MPEG-2 format natively without a hassle. 

As a digital video recorder, TiVo can record TV videos based on people's interest and allow people to watch the recorded videos anytime they want, especially the release of "Season Pass" and "WishList" features which facilitate TiVo more widely used in people's daily life. 

The movies or TV shows recorded with TiVo are in an encrypted format protected by DRM, thus incompatible to many multi-media programs and editing software such as Premiere Elements you may want to use to view or edit the TiVo files. 

As a result, it is required to convert the TiVo files to MPEG format for editing on Premiere Elements. So, how to convert TiVo to MPEG at the fastest speed? 


To solve the TiVo to Premiere Elements incompatible issues, you'd better download and use Brorsoft Video Converter. With it , you can quickly and easily convert manifold video files like TiVo, MKV, AVCHD, HD, AVI, WMV, MOV etc to MPEG files. You could get wonderful output files and never worry about out of sync. 

Download the best TiVo to Premiere Elements converter: 

  (Note: Click here for OS X 10.5) 

How to make TiVo editable in Adobe Premiere Elements 

Step 1: Launch the TiVo HD Video Converter and press "Option" button. Switch to "TiVo" tab in Option window, and enter TiVo Media Access Key. Then, click the Add button to import TiVo recordings to the TiVo convert tool for converting. 


Step 2. Choose output format 

This video converter offers optimized format preset for Adobe Premiere. Just click “Format” menu firstly and then follow “Adobe Premiere/Sony Vegas” to set MPG, MOV or WMV format. 


Tip: Before conversion, if you are not satisfied with the defaulted settings, you can adjust the parameters to meet your own demands, including audio&video bitrate, framrate, channels .etc. 

Step 3. Encode TiVo for Premiere Elements 

Click “Convert” button to start converting TiVo to MPEG-2(.mpg) for Premiere Elements. 

Once the conversion completes, you can click "Open" button to get the generated MPG files. Now, it is easy for you to import encoded videos to Premiere Elements 10/11/12/13/14 for editing. 

More Guides: 

Convert TiVo to Plex 
Convert TiVo to iMovie 
Convert TiVo to Android 
Convert TiVo to Premiere 
Convert TiVo to Final Cut Pro 
Convert iPad video to ProRes for Final Cut Pro 
Get 4K videos playable onto the new Apple TV 
How to Convert DVD ISO to play on Apple TV 4/3/2 
How to convert .dvdmedia to MOV/MP4 on Mac easily 
How to convert MKV to PowerPoint supported video formats

Thursday, June 25, 2015

Transcode/Downscale 4K MP4/MOV/MXF for iMovie editing

Summary: Have issues when importing MXF/MP4/MOV files in 4K to iMovie? Just follow this simple guide, which will quickly walk you through how to edit 4K MXF/MP4/MOV in iMovie '11/9/8 smoothly.

If you have some 4K camcorders like Red Epic, Blackmagic 4K, Panasonic GH4, GoPro Hero 3/Hero 4, Sony FS7, etc, you may obtain many 4K video clips. When you wanna import 4K to iMovie for further editing, you will probably got some issues like program crashed, black viewer screen, no audio track... So, what's the available workflow for different 4K videos(MXF/MOV/MP4) in iMovie? Okay. This article will present you how to work 4K MXF/MOV/MP4 files in iMovie flawlessly in detail.

As far as we know, the basic reason why we can’t import and edit 4K videos in iMovie is because currently 4K still cannot be well supported by iMovie. And due to the format compatibility problems, it is hard to handle 4K videos in iMovie. After multiple testing, we found an ultimate solution is to downscale 4K to 1080p and convert MXF/MP4/MOV to Apple InterMediate codec which ensures the best results when working with iMovie.

How to Convert 4K MP4/MOV/MXF for Editing in iMovie Smoothly

First download and install Brorsoft Video Converter for Mac, an easy-to-use yet professional Mac 4K Video Converter, which is the most ideal choice for you. Developed with the most advanced converting technology, this 4K video converter truly and fully supports input and output videos at upto 4K resolution. With it, you can effortlessly transcode any 4K videos to Apple InterMediate codec with 1080p settings for using in iMovie. Besides, the program also supports more professional encoders, ProRes, DNxHD, MPEG-2, ensuring the best results when editing with Final Cut Pro, Avid Media Composer, Adobe Premiere, etc. Plus, this 4K Video Converter is also available to customize the output resolutions to any size like 1080p, 2K, 4K as users want. Just download it and follow the tutorial below to get the work done.

Step 1: Add 4K videos

Install and launch the 4K to iMovie Converter, and then click "Add Files" button to import your 4K mp4, mov, mxf to the software.


Step 2: Choose output format

Click the Format column to select output format "iMovie and Final Cut Express > Apple Intermediate Codec(AIC) (*.mov)" as the best compatible video format for editing 4K in iMovie.


Tip: Advanced Settings You can click the “Settings” button and customize proper video/audio parameters if necessary. Video size, bitrate and fame rate are flexible and can be adjusted as you like. As far as I know iMovie like many editors use 1080p as primary delivery format, so 1080p would be the best settings. You can downscale 4K to 1080p by adjusting the video resolution.


Step 3: Start 4K video to AIC .mov conversion

Hit the convert button to start transcoding 4K MOV/MP4/MXF to iMovie on Mac OS X(Mavericks/Yosemite included). After the conversion, click Open to get the output videos. Launch iMovie and start your project.

Related Guides:

Tips for converting DNxHD to ProRes
How to Edit iPhone videos in Premiere Pro?
How to Import 4K video to Final Cut Pro 6/7/X
Import and Edit 4K video with Adobe Premiere Pro
Workflow for Working 4K footage in Sony Vegas Pro
Edit 4K Ultra HD Videos for Mac FCP/iMovie/Premiere
Prep SJCAM SJ4000 h.264 MOV Footage For Editing In FCP
Import 4K MXF/MOV/MP4 files to iMovie on Mac OS X 10.10
Convert H.265 to Premiere Pro CC/CS6/CS5/CS4 on Mac OS X
Import XAVC S files from Sony A7R II to Premiere Pro CC7/CS6/CS5
Getting Sony A7R II Media (4K XAVC S/AVCHD/MP4) into FCP 7/X

Monday, June 22, 2015

Can Avid Media Composer ingest 4K MXF/MOV/MP4 files?

To import source 4k videos to the Avid Media Composer , you need to convert the 4K MXF/MOV/MP4 footages to Avid DNxHD codec MOV format, which means you need some professional 4K MXF/MOV/MP4 to Avid Media Composer converter to help you realize the video importing process.Brorsoft Video Converter for Mac is your best choic, keep reading...

"4K" has become the hottest word in the digital photography and video field in recent years. Lots of 4K products such as 4K camcorders(Blackmagic 4K, Panasonic GH4, Sony FDR AX1/AX100...), 4K TVs, 4K movies are springing up. However, format compatibility issue is quite common in the video world, which is also true to the stunning 4K.

You will be wondering what to expect in terms of 4K support in Avid, since it seems like everything is shooting 4K these days. Although Media Composer has already had 4K and "high-resolution" (i.e., higher-than-4K) support via Avid Media Access (AMA) in previous versions and now the 4K to Avid Media Composer workflow has been even improved in Media Composer 8. Whereas, there's actually no way to edit a 4K project natively with Avid.


To prepare 4K footage for Avid, the easy option is to convert 4K MP4/MOV/MXF to Avid Media Composer supported DNxHD in 1080p settings. Brorsoft Video Converter for Mac is a professional tool that can deal with 4K videos regardless in .MP4, .MXF, .MOV format to DNxHD for Avid Media Composer editing without quality loss. It also enables you to customize the output resolutions to any size like 1080p, 2K, 4K as you need. Besides Avid, this 4K video converter can also encode/re-encode 4K files for smoothly importing and editing in Adobe Premiere Pro, Final Cut Pro, iMovie, Final Cut Express and more non-linear editing systems (NLE). For Windows users, you can turn to Video Converter.

Now just download the program and follow the below guide to convert 4K MXF/MOV/MP4 for playing and editing in Avid Media Composer perfectly.

Step 1: Load 4K videos

First and foremost, download and launch the 4K Video Converter on your Mac. Then, press the "Add" button to add 4K video file into the program. Batch conversion is supported, so you can add several files to the converter at one time.


Step 2: Choose Avid compatible format

To encode 4K files to Avid Media Composer, choose Avid Media Composer -> Avid DNxHD (*.mov) as the target format.


Tip: You can click "Settings" to fix the frame rate, bitrate, video size, etc to your needs, that you can play and edit 4K movies in Avid easily. Generally, 1080p video size is good for Avid MC editing.

Step 3: Convert 4K to Avid Media Composer

Click the convert button under the preview window, this 4K to Avid converter will start encoding 4K video for Avid Media Composer.

After the conversion, click the “Open” button to locate converted files, and then you can load the converted 4K MXF/MP4/MOV files into Avid Media Composer 5/6/7/8 for editing smoothly with the best quality.

More Guides:

How to Import 4K video to Final Cut Pro 6/7/X
How to convert VOB for Windows Movie Maker
Import and Edit 4K video with Adobe Premiere Pro
Workflow for Working 4K footage in Sony Vegas Pro
Editing Panasonic HC-X920 AVCHD in FCP 7, FCP X
Transcode 4K MXF/MOV/MP4 to DNxHD for Avid MC AVI to QuickTime - How to Play AVI in QuickTime Mac How to rip Blu-ray/DVD movies to Oneplus One/Two in clicks Transfer VOB files to WMV for importing to Windows Movie Maker Getting Sony A7R II Media (4K XAVC S/AVCHD/MP4) into FCP 7/X

Wednesday, June 17, 2015

HEVC to MPEG-2 Editing - Convert H.265 to Premiere Pro CC/CS6/CS5/CS4 on Mac OS X for Free Trial

The article is the very one working on the H.265 to Adobe Premiere CC/CS6/CS5/CS4 Mac conversion. It would show you the most efficient and easiest solution by using a professional Video Converter for Mac which has optimized preset for Premiere. The Mac job would be finished with only 4 clicks without losing video quality.

H.265 - High Efficiency Video Coding

HEVC is a new codec that has been growing in popularity since it’s recent unveil. It has proven to be faster and much more efficient than H.264 and in a few years there’s a good chance we’re all going to be using it. Here are a few things you need to know about HEVC:

1. High Efficiency Video Coding (HEVC) is a video compression format that succeeds H.264 and AVCHD.
2. HEVC is also known as H.265.
3. It can support 4k resolutions up to 8192 x 4320.
4. Netflix will begin using HEVC to stream 4k content later this year.
5. Amazon is shooting it’s original programming in HEVC 4k (a) for online streaming.
6. Broadcast companies won’t be able to stream HEVC 4K content for a several years.
7. File sizes are about 50% smaller using H.265 than using H.264.
8. Recent studies say (b) HEVC is visually superior than H264.
9. A download speed of 15Mbps is recommended to stream HEVC 4K content (c).
10.You can try encoding in HVEC today by downloading the free DivX encoding software.

Well, we can easily conclude that HEVC (H.265) videos are better than H.264 files. It also seems that it is not so friendly with players and editing tools on Windows&Mac. So if you want to edit/play HEVC (H.265) videos on Windows or Mac, you need to find a professional converter to transcode it first.

The following pages, i will show you a simple guide to help you editing H.265 Footage in Premiere Pro CC/CS6/CS5 natively with the help of Brorsoft Video Converter Mac .


This tool is a professional third party program to deal with HEVC (H.265) videos, you not only can reformt HEVC (H.265) videos to AVI, WMV, MOV, MP4, for eadily playing, but also can convert HEVC (H.265) files to the editing tools with professional codec, like MPEG for Premiere, DNxHD for Avid, .etc.

Tip: For Windows users, Brorsoft Video Converter is specially designed for dealing with HEVC (H.265) for playing and editing on Windows (Windows 8.1, Windows 10 included)

Download the best H.265 converter:

(Note: Click here for OS X 10.5)

Read More: H.265 vs H.264 | H.265 to iMovie | Play H.265 using VLC

Convert H.265/HEVC files to Adobe Premiere Pro

Step 1: Load H.265 videos to the program

Install and run the best H.265 to Premiere Pro converter and transfer your 4K H.265 recordings to the program no matter directly from a camera or from hard drive.


Step 2. Set output format

Click "Format" menu firstly and then follow "Adobe Premiere/Sony Vegas" to set MPEG-2 as the output format.


Step 3. Profile Settings

In case the default settings do not fit your requirement, you can click "Settings" button and enter "Profile Settings" panel to adjust video size, bit rate, frame rate, sample rate and audio channels. This H.265 converter app can maintain original 4K resolution for you if you need or downscale 4K to 1080p.

Step 4. Start converting H.265 to MPG

Click the "Convert" button; it would start transcoding H.265 to MPEG-2 for Premiere Pro immediately. After conversion, tap "Open" icon in the main interface to locate result video. Launch Adobe program to import converted H.265 footage to Adobe Premiere Pro CC/CS6/CS5 with easy editing.

Additional Tips:

Besides Adobe PP, this H.265 converter for Mac can also support converting H.265 files to Final Cut Pro, iMovie, Avid Media Composer, etc NLEs. What’s more, if you want to play H.265 videos in iTunes, QuickTime, VLC Media Player, this program is also the right app to help you convert and generate the optimal formats. Just choose a proper output format in the second step.

More Topics:

Tips for converting DNxHD to ProRes
How to convert AVI to iTunes free on Mac
Can't import XAVC S into FCP 7- A quick Fix
FFmpeg can't convert ProRes to MP4- Solution
Editing MP4 in Sony Movie Studio Platinum 12/13
Solution to Sony Movie Studio can't open AVI files
Batch convert MKV/VOB/AVI to Nexus 7/Nexus 10
How to convert videos on Windows 8.1 fast and easily
Convert XAVC MXF to ProRes 422, 4444 for Final Cut Pro

Monday, June 15, 2015

Convert DNxHD to ProRes on Mac(Yosmite/Mavericks)

Summary: Wanna an easy way to transcode DNxHD to Apple ProRes for easier playing and editing in Final Cut Pro? Read this article below and you will how to.

I was given a Full HD .mov in Avid DNxHD for post-production in Apple Final Cut Pro. But the problem is when I import DNxHD files to FCP, some troubles like choke, white screen, no audio, etc occurred. The basic reason is that Avid DNxHD is not completely native to FCP. As what I’ve figured out, if we intend to use DNxHD videos in FCP, we need convert DNxHD to ProRes. This article will present a step-by-step guide for you.

So, is there a tool that does a good job of converting DNxHD to Apple ProRes format. After searching further and widely, I found Brorsoft Video Converter for Mac can do the job well and bring me the best result. With it, you can easily convert all DNxHD files to ProRes 422, ProRes 422 HQ or 4444 for using in Final Cut Pro X/7/6. Besides, the Mac video converter can convert MKV, AVI, WMV, MPG, VOB for editing in Final Cut Pro, Final Cut Express, iMovie, Avid MC, Adobe Premiere Pro etc. Some simple video editing functions like trim, crop, watermark are also provided for you. Just download it and follow the tutorial below to convert Avid DNxHD to Apple ProRes for FCP.

Transcode DNxHD to ProRes 422, 4444 for Final Cut Pro

1. Download, install and run the DNxHD to ProRes Converter; click "Add Videos" icon to load your source DNxHD .mov files.


2. Click “Format” bar and choose “Final Cut Pro >> Apple ProRes 422 (*.mov)” as output format for editing XAVC in FCP with natively supported video codec.


3. Click the Settings icon if you’d like to customize advanced audio and video parameters like Video Codec, aspect ratio, bit rate, frame rate, Audio codec, sample rate, audio channels.


4. Hit the convert button, it will start converting DNxHD .mov to ProRes .mov for importing to Final Cut Pro 6/7 and FCP X immediately. Soon after the conversion, just click “Open” button to get the generated files for natively editing in Final Cut Pro perfectly.

More Topics:

Smoothly Editing XAVC S in Final Cut Pro 7
Can't import XAVC S into FCP 7- A quick Fix
Edit DivX/XviD in Movie Studio Platinum 12/13
Get DivX movie collection into iTunes on Mac OS X
Transfer Xvid, Divx codec AVI files to iTunes 12/11 for Playback
FCP DivX Solution: Easily Convert DivX to Final Cut Pro on Mac Convert Avid DNxHD to Prores 422, ProRes 422 HQ or 4444 with OS X Edit GoPro Hero2/Hero3/Hero 4 footage in Sony Movie Studio Platinum 12/13

Wednesday, June 10, 2015

How to Transcode Sony PMW-F55 4K XAVC to Avid DNxHD for Avid Media Composer

Recommend a smart video conversion tool to transcode Sony F55 4K XAVC to Avid DNxHD for smoothly editing in Avid MC. Plus, it is simple to download and safe to install. Just get one and try it out now.

Avid Media Composer is non-linear editing system. The program allows you for film editing, uncompressed standard definition (SD) video and high definition (HD) editing and finishing. I've been researching possible workflows for Sony F55 and Avid Media Composer, as I will work with the Sony F55 footage. As you know, Sony PMW-F55 is a professional-grade camera with an 8.9-megapixel 4K-enabled image sensor. With Sony F55, you can record Full HD XAVC clips 240fps RAW 2k and 60fps RAW 4K recoding onto the AXS-R5. However, I found many users complained the problems when trying to edit Sony F55 XAVC footage in Avid.


To avoid these problems or limit, it will be better to transcode Sony F55 footage to a more editing-friendly format, such a Avid Media Composer's DNxHD.

Brorsoft 4K Video Converter for Mac is now providing the most reliable and professional 4K solutions to all format issues including 4K XAVC/XAVC S, 4K MP4, 4K MOV, 4K MXF and more.

It provides hundreds of output format presets for 4K videos, such as DNxHD for Avid, Apple ProRes for Final Cut Pro, Apple InterMediate Codec for iMovie, MPEG-2 for Adobe Premiere. Besides, this 4K converter is also available to customize the output resolutions to any size like 1080p, 2K, 4K as users want. If you are working on Windows(Windows 10 included), please turn to Brorsoft Video Converter. Download the tool and start the 4K to Avid video conversion.

Download 4K to Avid Media Composer Converter:

(Note: Click here for OS X 10.5) Convert Sony F55 4K XAVC video to DNxHD for editing in Avid Media Composer

1. Load Source 4K XAVC Video Files

First and foremost, download and launch the 4K Video Converter on your Mac. Then, press the "Add" button to add PMW-F55 4K XAVC video file into the program. Batch conversion is supported, so you can add several files to the converter at one time.


Step 2: Click Format preset and choose Avid Media Composer -> Avid DNxHD (*.mov)” as the best video format for editing Sony XAVC in Avid as well as good video quality.


Tip: You can also click Settings to fix the frame rate, bitrate, audio and video quality to your needs.

Step 3: Hit "Convert" button to start Sony F55 XAVC to DNxHD .mov conversion. You can follow the conversion process from the pop-up windows.

After the conversion, you can import the converted Sony F55 files to Avid Media Composer (5.5/6.0/6.5) for smooth playback and editing. No more worries about the Sony F55 incompatibility with Avid Media Composer.

More Tips:

Playing WMV files on Kindle Fire HDX
How to import Sony XAVC to Final Cut Pro
Enable Kindle Fire HDX to play WMV videos
How to edit Sony XAVC codec in Pinnacle Studio
Load Sony PXW-X320 XAVC videos to Avid MC
Canon EOS C300/MXF work with Premiere Pro CS6
Can't import Sony PXW-X320 XAVC to FCP 6/7/X
Converting Sony XAVC videos to AIC MOV for iMovie
Import Sony PXW-X320 XAVC to Final Cut Pro 7 or FCP X
Get Canon T3i videos compatible with Windows Movie Maker
Working With Sony PXW-X320 XAVC in FCP 6/7/X Smoothly
Editing Sony PMW-F55/F5 XAVC footage in Adobe Premiere Pro

Thursday, June 4, 2015

Nexus 9 Video Playback Tip-Add and Play AVI/VOB/MKV on Nexus 9 with friendly format

Wanna to play MKV, AVI, VOB videos on Google Nexus 9 ? If so, you may need to convert these videos Nexus 9 supported video format first. Learn the step-by-step guide on converting MKV/AVI/VOB to Nexus 9.

Just got my Nexus 9 tablet for days. I want to put a bunch of AVI, VOB, MKV movies on Nexus 9[/b], but having a problem since a few of them won't play. I got some tech support for Nexus 9 video playback and know that AVI, MKV, VOB are not native supported formats by Nexus 9 tablet. So, to add AVI/MKV/VOB to Nexus 9 for smooth playback, you’d better to convert these files to a favorite MP4 video for Nexus 9 with the best video codec, frame rate and video resolution.

Based on other users’ suggestion and my testing, I applied the smart video convert tool- Brorsoft Video Converter to do the conversion task. What impressed me the most about my experience is that this video converter provides the built-in output profiles for Google Nexus tablet, making the conversion task much easier. With it, you can fast convert MKV, AVI, VOB to Nexus 9 friendly format without any quality loss. The input files also support WMV, FLV, MTS, MPG, TiVo, 3GP, MOV, etc. Everything makes me satisfied. For Mac users, please get Brorsoft Video Converter for Mac. Just follow the guide below.

How to Convert AVI/MKV/VOB for playback with Nexus 9

Step 1: Download and install the best Nexus 9 Video Converter and run it to import your AVI, MKV, VOB movie files. To join several videos into one, check off the “Merge into one” box.


Step 2: Choose a proper output video format for Google Nexus 9 by clicking Format bar. The video preset under Android> Google Nexus 10 H.264 Video(*.mp4) could fit on Nexus 9. Then you can click "Settings" to edit output parameters like resolution, frame rate, encoder, etc. as you like.


Step 3: Tap the Convert button to start converting AVI/VOB/MKV to Nexus 9 MP4. When the conversion ends, you will be able to import and play MKV, VOB, AVI files on Nexus 9 with the best quality.

See also:

How to Play VOB, MKV, AVI files on Galaxy Tab 4
How to Enable Kind Fire HD 6 to Play AVI/MKV/VOB
Encoding AVI/VOB/MKV/WMV to Play on iPhone 6/iPhond 6 Plus
Retrieve deleted message on iPhone 6/iPhone 6 Plus
How-To| Convert AVI, VOB, MKV to Galaxy S5/S6/S6
Recover text messages from iPhone 6/iPhone 6 Plus
A full solution to recover deleted or lost data from iOS devices
Transfer DivX Plus HD (MKV) files to your Sony PS3, PS4
Converting Video_TS files to AIC .mov for iMovie and FCE
How to Backup DVD/Blu-ray to USB Flash Drive
Watch/View Blu-ray/DVD movies onto Windows 8.1 Tablets
Enjoy DVD, Blu-ray movies in H.265/HEVC format

Monday, May 25, 2015

Panasonic HC-V720 and FCP X-Convert PA V720 MTS to ProRes MOV for Final Cut Pro 7/X on Mac (Yosemite)

If you are puzzeled with the problem that you can't edit your MTS footage from Panasonic HC-V720 in Final Cut Pro X, you’d better transcode your PA V720 AVCHD files first to resolve the incompatible problem.This article shows you how to convert Panasonic HC-V720 camcorder MTS files to MOV in Mac OS X for Final Cut Pro 6/7/X. Follow it to convert PA V720 footage to FCP with ease!

The Panasonic HC-V720 (specs) is a little lower in the lineup, but offers similar functionality with a new 50x optical zoom lens, optical image stabilization, built-in WiFi, 20.4-megapixel still picture capture, and a 3-inch touchscreen LCD. When you got some V720 footage, you may want to import HC-V720 1080 50p AVCHD to FCP or other Mac tools for editing to get a better effect video.


The only problem we are facing is that how can we import that kind of footages into your Final Cut products. We found that Apple does not provide native support for 1080 60p, 50p AVCHD video. So it is difficult for these camcorder users to edit Panasonic HC-V720 footage in FCP (X). Well, don’t’ worry. Here I will introduce one cool tool to you to help you import Panasonic HC-V720.mts to FCP X, FCP 6, 7.

Download and install Brorsoft MTS Converter for Mac

This professional app helps you import native 1080p AVHCD footage(2D, 3D as well) and export Apple ProRes 422 encoded .mov video, which can be imported to Final Cut Pro 7 and X without rendering. Plus, this Mac MTS Converter also provides optimal presets for iMovie, FCE, Adobe Premiere Pro, Avid Media Composer, etc, ensuring smooth editing with different video editing programs on Mac OS X (Yosemite & Mavericks).

How to convert Panasonic Panasonic HC-V720 footage into FCP

1. You need to download, install and run the smart MTS to ProRes Converter Mac and transfer your MTS recordings to the program from the camcorder.


2. Click “Format” bar and set “Final Cut Pro >> Apple ProRes 422 (*.mov)” format. If you prefer smaller file size, please choose “Apple ProRes 422 (LT) (*.mov)” instead.


Tip: You also can click “Settings” to set video frame rate, video size and Video Bitrate as you want.


3. As soon as all things are finished, please click “Convert” button to start the 1080 60p/50p MTS conversion on Mac. When conversion finishes, press “Open” button to get converted MOV video for FCP.

4. Open Final Cut Pro, and go to “File>>Import>>Files…” to import converted MTS footage to FCP project. You can get a smooth workflow.

Related guides:

Convert DVD to Play on iPhone 5S/iPhone 5C
How to transfer TiVo shows to iTunes library
VOB to H.264 MP4 for Uploading to Vimeo Playback
How to Convert & Import AVCHD Lite to Final Cut Pro
Edit Nikon D5200, D7000 in Premiere Pro CC, CS6, CS5
Editing Samsung NX1 video files in Sony Vegas Pro 13/12/11
Transcode Panasonic HC-V707 1080/50p AVCHD video for iMovie
Import Sony F65 SR codec footage(.MXF) to DNxHD for Avid MC
Editing MTS files from Cnon VIXIA HF R400 to iMovie 11/09/08
Editing 2K/4K RAW from Sony F5 in Final Cut Pro 7 (Yosemite)
Edit Panasonic GH4 MP4/MOV/AVCHD in FCP X (Yosemite)
Two Ways to Import Canon XF100 MXF to Premiere Pro CC/CS6
Edit Sony XDCAM camera files in iMovie (Yosemite & Mavericks)
FCP 7/X/6 can't import (Log & Transfer) Sony FS700 4K/2K RAW movie

Friday, May 22, 2015

Import MPG/MPEG File for Final Cut Pro, FCP X Editing (Yosemite)

Have trouble importing MPG(MPEG) files into Final Cut Pro 7, FCP X for further editing? If so, follow the quick-start guide to learn how to prepare MPG videos for editing in Final Cut Pro without quality loss.

We usually saw FCP users encounter importing issues when attempting to edit MPG or MPEG files with Final Cut Pro X. Let's see some frequently asked questions on this:

Q1: I have a camera that exports video from my camera to mpeg 2 on the computer. Does Final Cut pro support MPEG 2? Does the quality look good?

Q2: I am trying to import MPEG-2 files into FCP X. I have the raw files from a Sony Handycam HDR-SR5. These files were recorded as MPEG-2 files and copied from the camera hard drives (entire folders were copied containing the MPEG-2 files) to a local hard drive on my computer. Final Cut Pro X does not recognize the files and will not import them.

You probably would like to use Final Cut Pro to edit MPG or MPEG-2 files, especially some recordings from a camcorder to get better videos or more wonderful video files. While, some errors appeared: file import failure, audio going out of sync, video but no audio when brought into the timeline.

In fact, MPEG video compression is only ideal for recording and playback. If you want to edit MPEG-2 in Final Cut Pro X, you need to transcode them to a more edit friendly format. Now I’ll share you the best way how to work with MPEG/MPG files in Final Cut Pro(X). Get the tricks bellow.

Since the most compatible video format for FCP editing is Apple ProRes MOV. So you need to find a third party program to convert mepg-2 to ProRes first before loading to FCP. Here Brorsoft Video Converter for Mac is highly recommended to help you achieve your goal.

With this powerful video converter program, you can effortlessly transcode MPEG-2 to FCP friendly movie format ProRes (Note: it applies to all versions including FCP X, FCP 6, FCP 7, etc) keeping the original quality. Besides Final Cut, this software can also export AIC for iMovie/FCE, DNxHD for Avid Media Composer and more NLE systems. Below is the detailed guide on converting MPEG/MPG clips to Final Cut Pro X friendly videos for smoothly playback and editing.

Converting MPG/MPEG to Apple ProRes 422 MOV for Final Cut Pro X

1. Load MPG/MPEG files to the Program

You can directly drag and drop the MPG/MPEG files to the software, or click "Add" button to locate the source files into the MPG to FCP Mac converter.


2. Choose Final Cut Pro Profile

Press "Format" option and navigate the mouse cursor to choose "Format > Final Cut Pro > Apple ProRes 422 (*.mov)" as the best codec for FCP 6/7 and FCP X on Mac.


Tip: Before conversion, you can click the “Settings” icon to customize the video/audio settings: Video Codec, video size, bit rate, frame rate, Audio codec, sample rate, audio channels for Final Cut Pro.

3. Start MPG to FCP X Conversion on Mac OS X

Click the big "Convert" button at the bottom right corner, this Mac video converter will start to convert MPG/MPEG to ProRes for Final Cut Pro X immediately. Once the conversion completes, directly import the converted files to Final Cut Pro X, and then you can play, edit MPG/MPEG files in Final Cut Pro X freely.


Additional tips:

1. For FCP X users, before you try to do the conversion, don’t forget to make sure that you have installed the Apple ProRes Codec manually since the FCP X asks users to install it by themselves.

2. If you want to edit MPEG/MPG in iMovie or FCE, you just need to choose the “iMovie and Final Cut Express -> Apple InterMediate Codec (AIC) (*.mov)” as the output format in the second step.

Related posts:

How to Import Blu-ray to Final Cut Pro X
How to Import DVD clips into Final Cut Pro
How to convert a MVI file to .avi, .wmv, .flv, mov…?
Rip DVD/ISO to Yoga 2 Tablet mp4 format Playback
Edit Sony DSC-WX500 in FCP 7, FCP X(Yosemite)How to upload MKV/AVI/WMV files to Final Cut Pro Edit MP4 files in iMovie 11/09/08 with AIC MOV format How to put and add MKV/AVI/VOB files to Blackphone 2 Converting VOB to Apple ProRes 422 MOV for Final Cut Pro X Take MP4 clips off Sony PMW-EX1 and Edit with Final Cut Pro Import Canon C300 mxf footage into Avid, Premiere, iMovie, FCP Converting MTS files to ProRes MOV for Editing in Final Cut Pro Transcode Sony DSC-WX500 XAVC-S files to Adobe Premiere Pro CC/CS6

Thursday, May 21, 2015

PMW-200 Full HD 422 at 50 Mb/s MXF in Avid-Import MPEG HD422 50 Mbps recording on Sony PMW-200 to Avid Media Composer

In this page, we aim to share some tips and tricks to solve the Sony PMW-200 workflow on Mac like how to import Sony PMW-200 MXF to Avid Media Composer under Mac OS X (Yosemite & Mavericks) smoothly.

Sony PMW-200 Camcorder
Sony PMW-200 (PMW200) Full HD XDCAM EX 1/2inch CMOS camcorder with 50Mb/s recording

The PMW-200 is Sony's successor to the hugely popular PMW-EX1 Camcorder.The camcorder can record in Full HD 422 at 50 Mb/s, delivering exceptional performance, operational versatility and workflow efficiency. Its high-quality MPEG HD422 50 Mbps recording is fully compliant with the latest EBU recommendations for long-form broadcast production and is widely accepted in broadcasting stations and production houses. This capability ensures the camcorder is ideal for a wide range of different applications, including news gathering and documentary production.

If you met any Sony XDCAM HD422 MXF to Avid MC importing or editing issues like the below user had, go through the page to find the solution.

I’ve been exporting mxf clips from a Sony EX1 and then importing them into Avid for years… always worked well and happened pretty fast. But I have an hour-long clip (an interview) shot with my new Sony PMW-200, and it’s taking forever to import into Avid (v.6.2). A bit more info, in case it pertains:

I first exported the clip (MPEG2 HD Long 35Mbps) from my SxS card to a hard drive (on my MacBook Pro, which has an ExpressCard slot). The export (this is using Sony’s Content Browser) happens very quickly (faster than it used to with my EX1 clips), but, as I’ve said, the import of this clip into Avid doesn’t seem to want to happen.


What caused the problems? As we know, XDCAM HD422 products record and play back high definition video with 1920 x 1080 and 1280 x 720 resolutions using MPEG HD422 compression and the XDCAM HD422 video footage is wrapped in an MXF container, which is can not natively imported by many professional video editing application including the Avid Media Composer. So, it will be a bit hard when importing XDCAM HD422 video footage with Avid MC. While, things can be different if you get some help from third-party software Brorsoft MXF Converter for Mac.

Overall, the program is a professional yet easy-to-use MXF Converter on Mac OS X, which can not only convert Sony PMW-202 MXF files to DNxHD codec videos for Mac editing, but also provide simple video editing functions for you. This Mac MXF Converter can also transcode MXF videos from Canon C30O XF100, XF105, XF305, Pansonic P2 cameras for editing in Final Cut Pro 6/7, Final Cut Pro X, Final Cut Express, iMovie, Avid MC, Adobe Premiere Pro, etc on Mac OS X(Lion and Mountain Lion included). Just download it and follow the tutorial below to get the work done.

Guide: Transcoding Sony PMW-200 MXF files for editing in Avid Media Composer on Mac

Step 1: Import video files from your Sony PMW-202 to the MXF to Avid MC Converter Mac.

Note: Before conversion, you need to transfer MXF files from your Sony PMW-200 to Mac Hard Drive, then click the “Add files” button to browse to import MXF videos.


Step 2: Click on “Format”, and select output format from the drop-down list. Follow “Avid Media Composer” > Avid DHxHD (*.mov)”.


Step 3: Click “Convert” button to start converting Sony PMW-200 mxf files to Avid DHxHD .mov for Media Composer under Mac OS X.

Tip:Some more helpful features of the Mac MXF to MOV Converter:

1. Settings- Click “Settings” button if you’d like to customize advanced audio and video parameters like Video Codec, aspect ratio, bit rate, frame rate, Audio codec, sample rate, audio channels.

2. Editor (next to “Add” icon)- click to set deinterlace, denoise, mute, volume up, trim, crop, etc.

Once the XDCAM MXF Mac conversion is done, you can transfer Sony PMW-200 MXF footage into Avid Media Composer 5/5.5/6/6.5 for editing smoothly on Mac with ease.

If you have problems when importing or editing your Canon, Sony, Panasonic etc, camera video files, you can check out “Brorsoft Camcorder/Camera Importing Tips” or “FCE, FCP, iMovie Column” to get your solutions.

See more MXF Related tutorials:

Import 4K MP4/MOV from DJI inspire 1 to AE
How to import nanoFlash MXF files to Avid MC
Importing Sony PDW-HD1550 XAVC to FCP 7/X
How to work DJI Inspire 1 4K footage in After Effects
How to load Sony XDCAM MXF files to Premiere Pro
How to convert Canon MXF for Cyberlink Powerdirector
How to work Sony PMW-RX50 XAVC in FCP 7/FCP X
Transcoding Canon MXF footage to DNxHD for Avid MC
Convert Sony PMW-500 MXF to ProRes for Final Cut Pro
Editing DJI inspire 4k MP4/MOV files in Final Cut Pro X/7
How to work Sony PMW-RX50 XAVC in Premiere Pro CC/CS6

Sunday, March 8, 2015

Sony AVCHD iMovie Tips-3 Steps to Make Sony AVCHD video files editable in iMovie

I’m about to the point where I want to import Sony AVCHD to iMovie for editing and am wondering what would be the best way to go about it?

Source From: Tricks for Editing Sony AVCHD files in iMovie

Sony is specializing in electronics, game, entertainment and financial services sectors. The AVCHD cameras and camcorders from Sony are much famous that attract lots of users. For video compression, AVCHD uses the MPEG-4 AVC/H.264 standard, supporting a variety of standard, high definition, and stereoscopic (3D) video resolution, which makes itself incompatible with some professional NLEs.

"I got some outstanding videos from my Sony Handycam and planed to import these AVCHD videos into iMovie for editing. However, iMovie crashed while I tried to load one of my video into it. Is iMovie incompatible with Sony AVCHD? What should I do?"

AVCHD files are not accepted by iMovie, even though iMovie 09 /11 are declared to extract AVCHD files, but actually when you try to import AVCHD to iMovie, various problems still come owing to codec issue. The direct and convenient solution for transferring Sony AVCHD to iMovie is to transcode AVCHD to AIC (Apple InterMediate Codec), the most friendly codec for iMovie with a powerful third party program.

Brorsoft MTS Converter for Mac is developed specifically for converting AVCHD files to video formats usable on iMovie with professional AIC codec. On top of that, it also can help users encode AVCHD videos into other NLEs and portable devices including FCP, Premiere, Avid, Samsung Tablet, Nexus, iPad, iPhone .etc. Now download the software on your Mac (Yosemite included) and follow the guide below to start conversion.

How to Convert Sony AVCHD to AIC for iMovie

Step 1: Install and launch the powerful Mac AVCHD to iMovie Converter, and click the "Add" button to load the Sony AVCHD videos.


Step 2: Click the format bar to choose iMovie and Final Cut Express > Apple Intermediate Codec (AIC) (*.mov) as the output format.


Tip: Before conversion, you can go to "Settings" page to customize the video/audio settings for iMovie: 1920*1080 vide size; 30fps frame rate(for original 60fps videos) or 25fps frame rate(for original 50fps videos).


Step 3: Tap the Arrow Convert button on the main interface to start Sony AVCHD to iMovie conversion.

When the conversion finished, you can directly import the output AIC MOV files under "Open" panel to iMovie for editing without problem.

Related Posts:
Tricks for editing Sony A7 II XAVC S in FCP 7
Convert Canon T6s(760D) MP4 files to iMovie 11
Watch and View Blu-ray , DVD movies on Nexus 5
Blu-ray Changed to M4V Format for Apple Products
Canon EOS 5DS to FCP, iMovie, FCE Best workflow
Edit MP4 files from Canon 760D/T6s in Final Cut Pro
How to import Sony Handycam 1080p AVCHD videos to Mac
Converting XAVC to MOV on Mac OS X(Mavericks, Yosemite)
Transcode Sony Z100 XAVC footages to Edit in Adobe Premiere CC/CS

Monday, March 2, 2015

AVI to Premiere Elements 13/12/11?-How to Open an AVI in Adobe Premiere Elements

This is a detailed explanation for anyone who's confused by how to import and edit AVI files in Premiere Elements 13/12/11. Read on to get some tricks from it.

Sourc From: Steps to convert AVI files to Premiere Elements

There are two typical issues from the Pinnacle users quoted as below.

Q1: AVI importing error in Premiere Elements

Today, I sat down with Fraps and tried to record gameplay. When I was done recording, I compressed the video file with VirtualDub using the XVid Codec. This is when the problem starts. When I open up Premiere Elements 10 and try to import the file it won't work. The error is: "This type of file is not supported, or the required codec is not installed".

Q2: Adobe Premiere Elements AVI Files No Video

So I use Premiere Elements 11. I import the .avi files. The screen shows nothing, but the audio is playing. Fun fact: I recorded a long gaming session to upload to youtube in parts. So I split the same file in half in Premiere and uploaded it. Forgot to save. Now I come to split it again in the same place. No video.

Actually, Adobe Premiere Elements has the ability to support AVI format. However, AVI is a container format with different video audio codecs. In usual, Premiere Elemets won't import AVI files created by Windows Movie Maker; captured from VHS, CamStudio or other source encoded in XviD, DivX smoothly. To get rid of the issues, you will need to transcode AVI to a more "edit" friendly codec for Premiere Elements like MPEG-2.

Now I share the guide with you how to convert AVI video to Premiere Elements friendly format using Brorsoft Video Converter for Mac. With it, you can effortlessly encode/re-encode AVI for smoothly importing and editing in various non-linear editing systems (NLE), including Adobe Premiere Elements, Adobe Premiere Pro, Final Cut Pro, iMovie, Avid MC and more. For working AVI clips in Premiere Elements on Windows, try Brorsoft Video Converter. Below is the detailed guide for you.

1. Download, install and run the AVI converter app; click "Add" icon to load your source videos.


2. Choose output format. Just click "Format" menu firstly and then follow "Adobe Premiere/Sony Vegas" to set MPG, MOV or WMV format.


3. Click "Settings" button if you’d like to customize advanced audio and video parameters like Video Codec, aspect ratio, bit rate, frame rate, Audio codec, sample rate, audio channels.


4. Hit the convert button, it will start transcoding AVI for importing to Premiere Elments immediately. Soon after the conversion, just click “Open” button to get the generated files for natively editing in Premiere Elements 8/9/11/13 perfectly.

Additional Tips: This AVI to Premiere Elements Converter not only can help you convert .avi to Adobe Elements, but also enables anyone with AVI files to use in any non-linear editor like Final Cut Pro, iMovie, FCE, Avid Media Composer, etc as long as transcode AVI to a recognizable format. It’s a great tool to meet your different needs.

More Topics:

Viewing Blu-ray collection movies on Surface 3
How can i use VOB files in After Effects CS5/CS6
VOB files on Premiere Elements 10/11/12 not supported?
Solution to Importing AVI files into Adobe Premiere Pro
Sony 4K to Quicktime MOV-XAVC/XAVC-S to Quicktime
How to Import OBS Recorded Files to Adobe Premiere Pro
Rip DVDs by using Alternative Handbrake software in OS X
AVI Converter - Convert AVI to MOV, MP4, iTunes, iMovie
How do I add/attach subtitles(SRT, ASS, SSA) to a .AVI file?
How to Convert and Import AVI to After Effects CS4/CS5/CS6/CC

Thursday, February 26, 2015

FCP set up to import PDW-850 XDCAM Footage-Transferring Sony PDW-850 MXF files to FCP 6/7/X

We can’t import and edit Sony PDW-850 MXF in FCP X directly. And Apple ProRes is the codec that Final Cut Pro natively recognizes. So the problem can easily turn to be how to convert Sony PDW-850 MXF footage to ProRes MOV for edting in Final Cut Pro (FCP X, FCP 7, FCP 6).

Just install Brorsoft Sony XDCAM MXF Converter for mac, which allows you to convert MXF files from Sony PDW-850 to Apple ProRes 422 MOV for smoothly editing in Final Cut Pro 6/7 and FCP X. And The whole process takes only three easy steps to convert:
1. Add MXF videos from HD camcorders Sony PDW-850. Then,
2. Select the preset profile FCP(" Final Cut Pro > Apple ProRes 422 (*.mov) is FCP’s most compatible format").
3. At length, only one click of “convert” to start conversion from MXF to Prores.

Okay, following pages, let's look at the whole process in detail.


First See Something about Sony PDW-850 :
. New Shoulder XDCAM Disc Camcorder
. Direct successor of PDW-700 and PDW-F800
. New 3 x 2/3" inch CCD sensors (F12&50Hz)
. Improved S/N ratio : 62db
. Multiple codecs : SD/HD420/HD422
. Lighter 4,2 Kg and less power consuming 37W
. Improved LCD panel QHD 960 x 540

High picture quality with three 2/3-inch-type Power HAD FX CCDs recording at MPEG HD 422 50 Mbps

The CCDs offer the world’s top-end picture quality, with high sensitivity (F12 at 50i), wider dynamic range and the elimination of motion artefacts. On top of this, the PDW-850 offers an excellent signal-to-noise ratio of 62dB. It records the most popular broadcast MXF formats: MPEG HD 422 50 Mbps, MPEG HD 420 35 Mbps and 25 Mbps, MPEG IMX 50 Mbps and DVCAM.

The MXF files are not support by many NLE programs on Mac natively; hereby if you want to edit them in Final Cut Pro 6/7/X, you’d better to convert Sony PDW-850 MXF footage to ProRes encoded mov files for that’s the most compatible format for FCP.

Guide: Transcoding Sony PDW-850 MXF files to ProRes 422 for Final Cut Pro

Free Download the Mac Sony MXF to ProRes Converter:

( Note: Click here
for OS X 10.5)

Step 1: Import MXF files from your Sony PDW-850 to the MXF to FCP Converter Mac.

Note: Before conversion, you need to transfer MXF files from your Sony PDW-850 to Mac Hard Drive, then click the "add files" button to browse to import MXF videos.


Step 2: Click the format bar, and move mouse cursor to "Final Cut Pro > Apple ProRes 422 (*.mov)" as output format.


Step 3: Click "Convert" button to start transcoding Sony PDW-850 mxf files to Apple ProRes MOV for Final Cut Pro 6/7/X under Mac OS.

Some more helpful features of the Free Mac MXF to MOV Converter:
1. Settings- click to set video resolution(1920×1080/1440×1080/1280×720/720×480), bitrate(from 1Mbps to 20Mbps), frame rate (24p/30p)

2. Editor (next to "Add" icon)- click to set deinterlace, denoise, mute, volume up, trim, crop, etc.

Once the MXF to ProRes 422 conversion is done, you can transfer Sony PDW-850 MXF footage into Final Cut Pro 6/7/X for editing smoothly on Mac with ease.

More Useful Guides:
Put Nikon D810 h.264 videos to Sony Vegas Pro
Steps to convert AVI files to Premiere Elements
Rewrap C300 MXF to FCP 7/FCP X(Yosemite)
Converting Nikon D810 H.264 MOV to Edit in iMovie
VOB files on Premiere Elements 10/11/12 not supported?
Canon HF G20 Convert Files to Mac FCP/Avid/iMovie/FCE
Rip DVDs by using Alternative Handbrake software in OS X
Solve FCP 6/7/X can’t import Nikon D3200 H.264 MOV issue
Import and edit PXW-X70 XAVC video in Avid Media Composer