If you have some 4K camcorders like Red Epic, Blackmagic 4K, Panasonic GH4, GoPro Hero 3/Hero 4, Sony FS7, etc, you may obtain many 4K video clips. When you wanna import 4K to iMovie for further editing, you will probably got some issues like program crashed, black viewer screen, no audio track... So, what's the available workflow for different 4K videos(MXF/MOV/MP4) in iMovie? Okay. This article will present you how to work 4K MXF/MOV/MP4 files in iMovie flawlessly in detail.
As far as we know, the basic reason why we can’t import and edit 4K videos in iMovie is because currently 4K still cannot be well supported by iMovie. And due to the format compatibility problems, it is hard to handle 4K videos in iMovie. After multiple testing, we found an ultimate solution is to downscale 4K to 1080p and convert MXF/MP4/MOV to Apple InterMediate codec which ensures the best results when working with iMovie.
How to Convert 4K MP4/MOV/MXF for Editing in iMovie Smoothly
First download and install Brorsoft Video Converter for Mac, an easy-to-use yet professional Mac 4K Video Converter, which is the most ideal choice for you. Developed with the most advanced converting technology, this 4K video converter truly and fully supports input and output videos at upto 4K resolution. With it, you can effortlessly transcode any 4K videos to Apple InterMediate codec with 1080p settings for using in iMovie. Besides, the program also supports more professional encoders, ProRes, DNxHD, MPEG-2, ensuring the best results when editing with Final Cut Pro, Avid Media Composer, Adobe Premiere, etc. Plus, this 4K Video Converter is also available to customize the output resolutions to any size like 1080p, 2K, 4K as users want. Just download it and follow the tutorial below to get the work done.
Step 1: Add 4K videos
Install and launch the 4K to iMovie Converter, and then click "Add Files" button to import your 4K mp4, mov, mxf to the software.

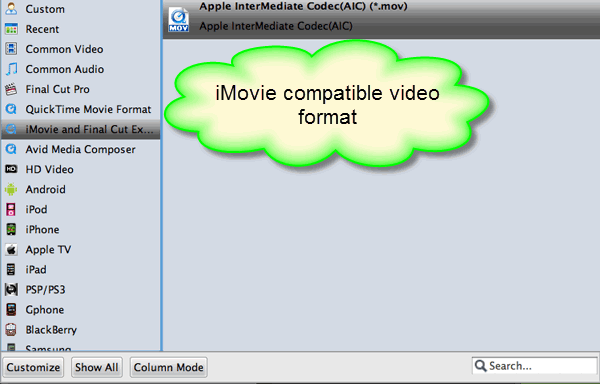
Step 2: Choose output format
Click the Format column to select output format "iMovie and Final Cut Express > Apple Intermediate Codec(AIC) (*.mov)" as the best compatible video format for editing 4K in iMovie.
Tip: Advanced Settings You can click the “Settings” button and customize proper video/audio parameters if necessary. Video size, bitrate and fame rate are flexible and can be adjusted as you like. As far as I know iMovie like many editors use 1080p as primary delivery format, so 1080p would be the best settings. You can downscale 4K to 1080p by adjusting the video resolution.

Step 3: Start 4K video to AIC .mov conversion
Hit the convert button to start transcoding 4K MOV/MP4/MXF to iMovie on Mac OS X(Mavericks/Yosemite included). After the conversion, click Open to get the output videos. Launch iMovie and start your project.
Related Guides:
Tips for converting DNxHD to ProRes
How to Edit iPhone videos in Premiere Pro?
How to Import 4K video to Final Cut Pro 6/7/X
Import and Edit 4K video with Adobe Premiere Pro
Workflow for Working 4K footage in Sony Vegas Pro
Edit 4K Ultra HD Videos for Mac FCP/iMovie/Premiere
Prep SJCAM SJ4000 h.264 MOV Footage For Editing In FCP
Import 4K MXF/MOV/MP4 files to iMovie on Mac OS X 10.10
Convert H.265 to Premiere Pro CC/CS6/CS5/CS4 on Mac OS X
Import XAVC S files from Sony A7R II to Premiere Pro CC7/CS6/CS5
Getting Sony A7R II Media (4K XAVC S/AVCHD/MP4) into FCP 7/X
No comments:
Post a Comment